Collector
Create a New Collector
For each questionnaire, the system will generate a default collector. By clicking "Add Collector," you can add another collector for the current questionnaire. The system allows for multiple collectors to be configured for the same questionnaire, and each collector can be set with completely different parameters.
After adding a new collector, set the collector's name and the corresponding collection channel in the pop-up dialog box.
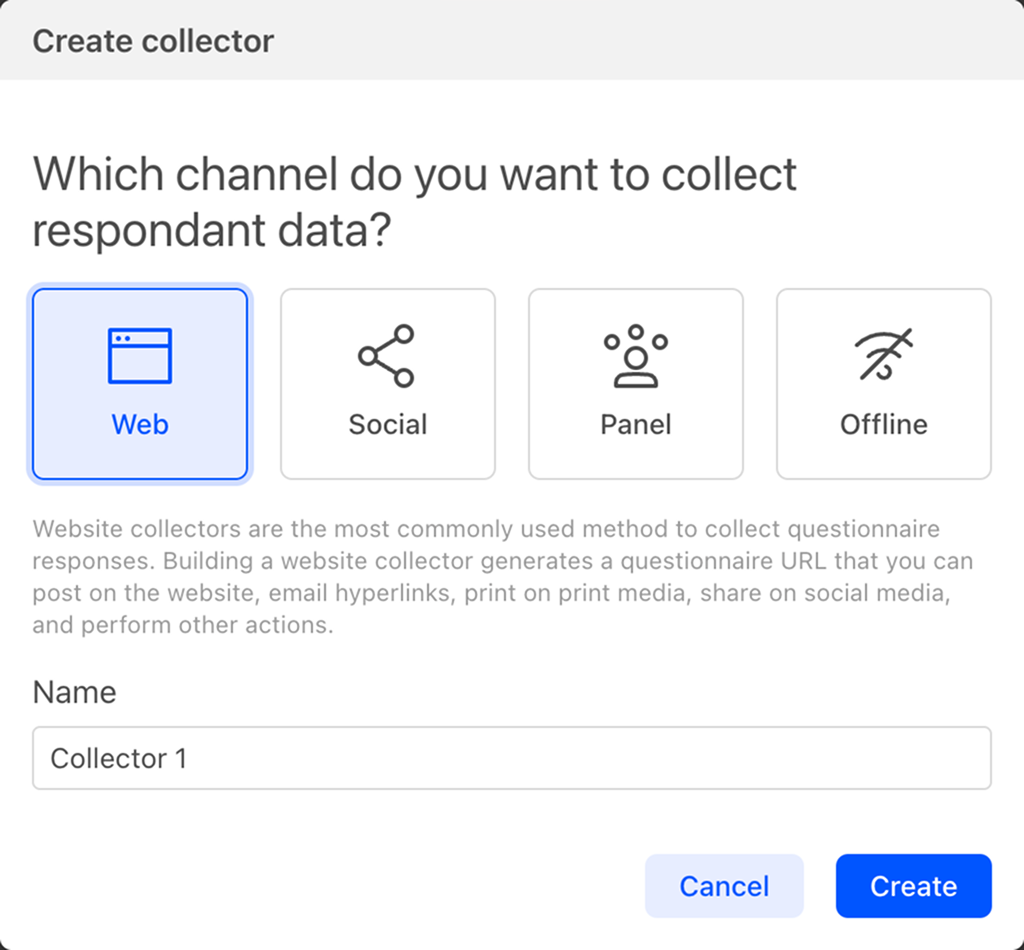 The system supports the following three different channels:
- Web: You can share and disseminate the collector link on various channels such as websites, WeChat, and Weibo to collect data.
- Panel: Collect data from the system-certified sample database.
- Offline: After creating an offline questionnaire collector, you can download the offline questionnaire in the Choiceform Offline APP and complete the questionnaire data collection without an internet connection.
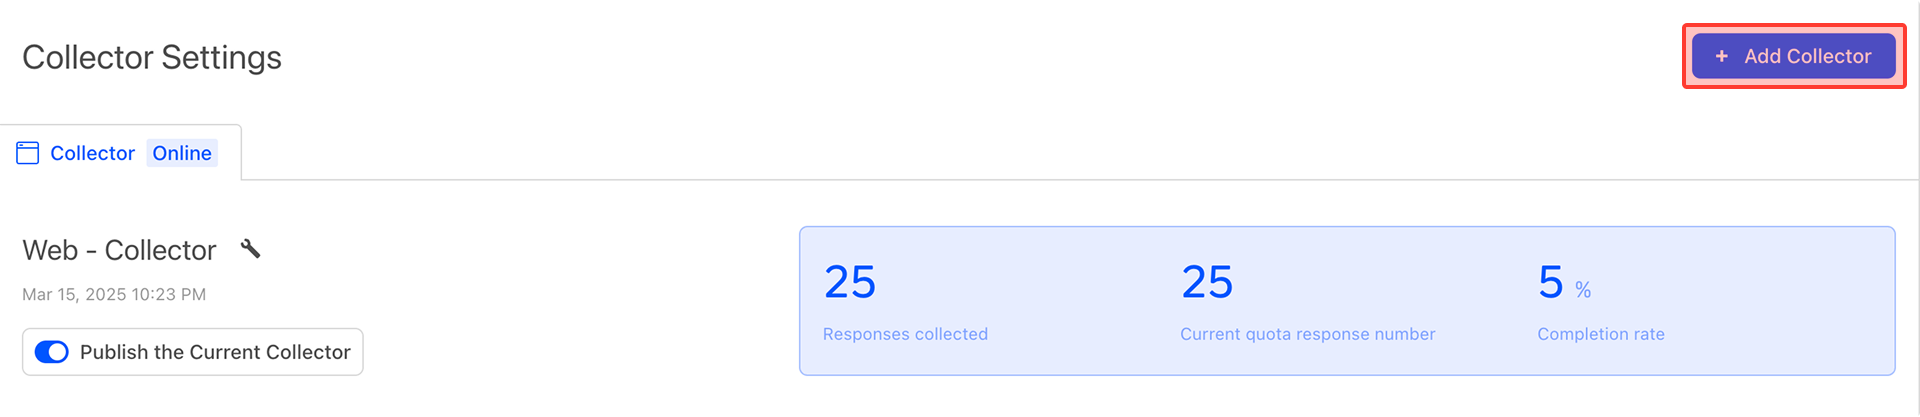
Collector Settings
Collectors are used to collect questionnaire data, and multiple different collectors can be enabled for the same questionnaire. Moreover, each collector can have its own unique name and settings.
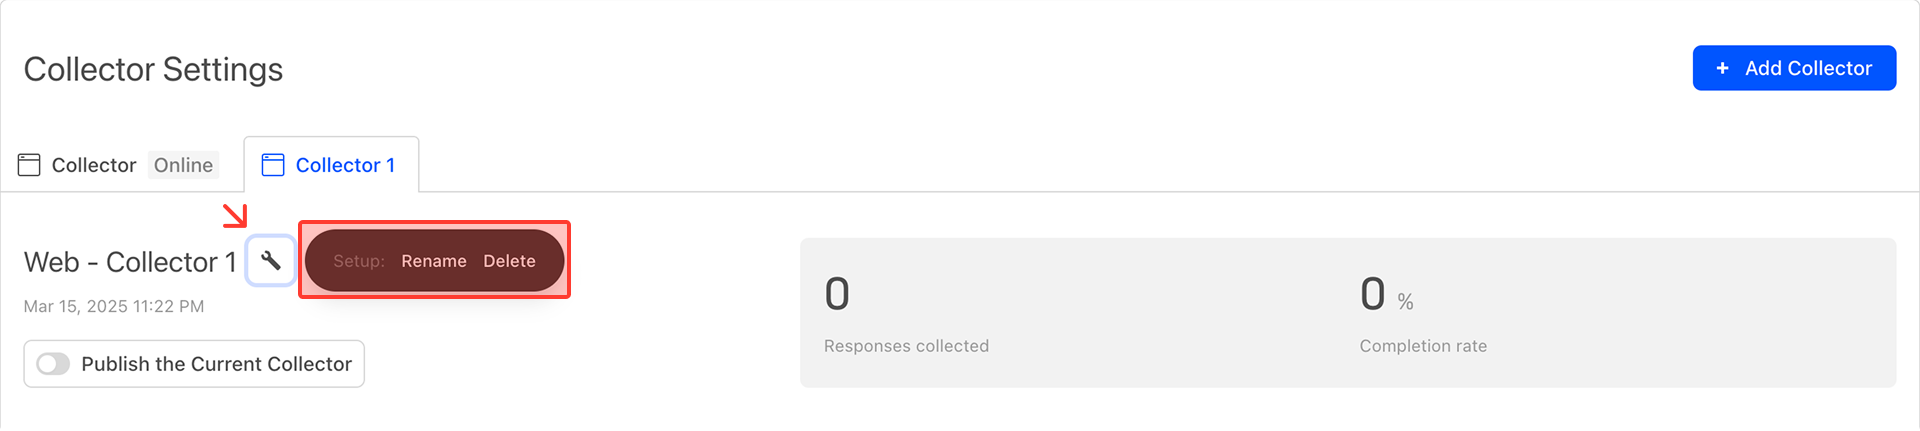
Collector Name
Multiple collectors can be associated with a single questionnaire, so naming the collectors can improve their identifiability.
Rename Collector
Click to modify the collector's name.
Delete Collector
Click to delete the current collector.
Collector Toggle
When enabled, the questionnaire switches to a non-editable state, and official QR codes and links for the questionnaire are generated. These official QR codes and links can be used for data collection. Click to toggle the collector's on/off status.
Collection Information Summary
Displays the current number of responses for the collector, the current quota of responses, and completion rate data.
Response Limits
Before publishing the questionnaire, you need to set the total number of questionnaire responses to be collected.

Response Quantity Setting
Enter a numerical value to set the number of questionnaire responses to be collected by the current collector. Once the collected data reaches the specified number, the collector will automatically close.
Unlimited Replies
When enabled, the collector will continue to collect questionnaire responses until it is manually closed.
Add Quota
In addition to setting a specific number, the system also supports using designated quotas as the response limit. Click on the quota list below the response number input box and select the desired quota from the pop-up menu.
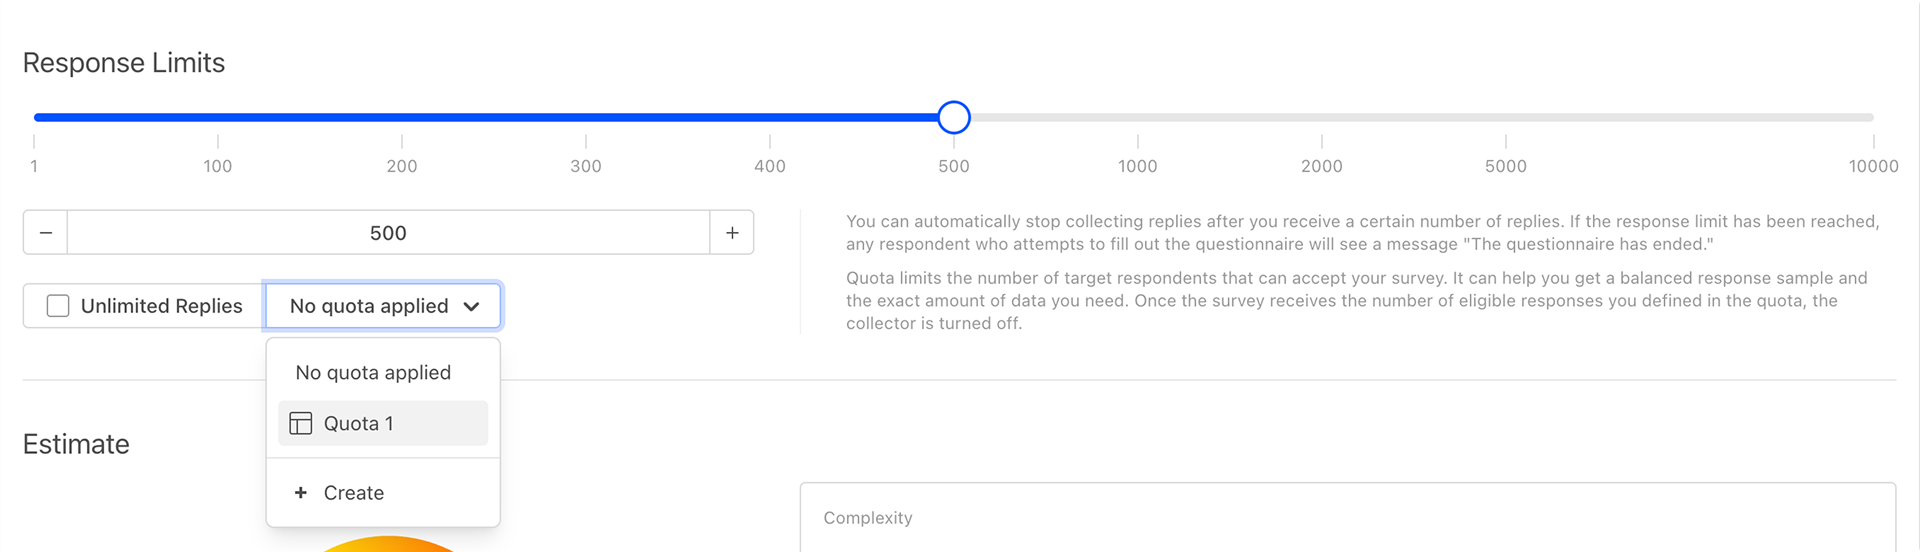
After selecting a quota, the response limit will automatically be set to the specified number within the quota. Alternatively, click "Add" to generate a new quota directly.
Sharing Settings
Questionnaire Collector Link and QR Code
After publishing the questionnaire collector, the system will generate an official link and QR code. Once the collector is published, the official link and QR code will never change.
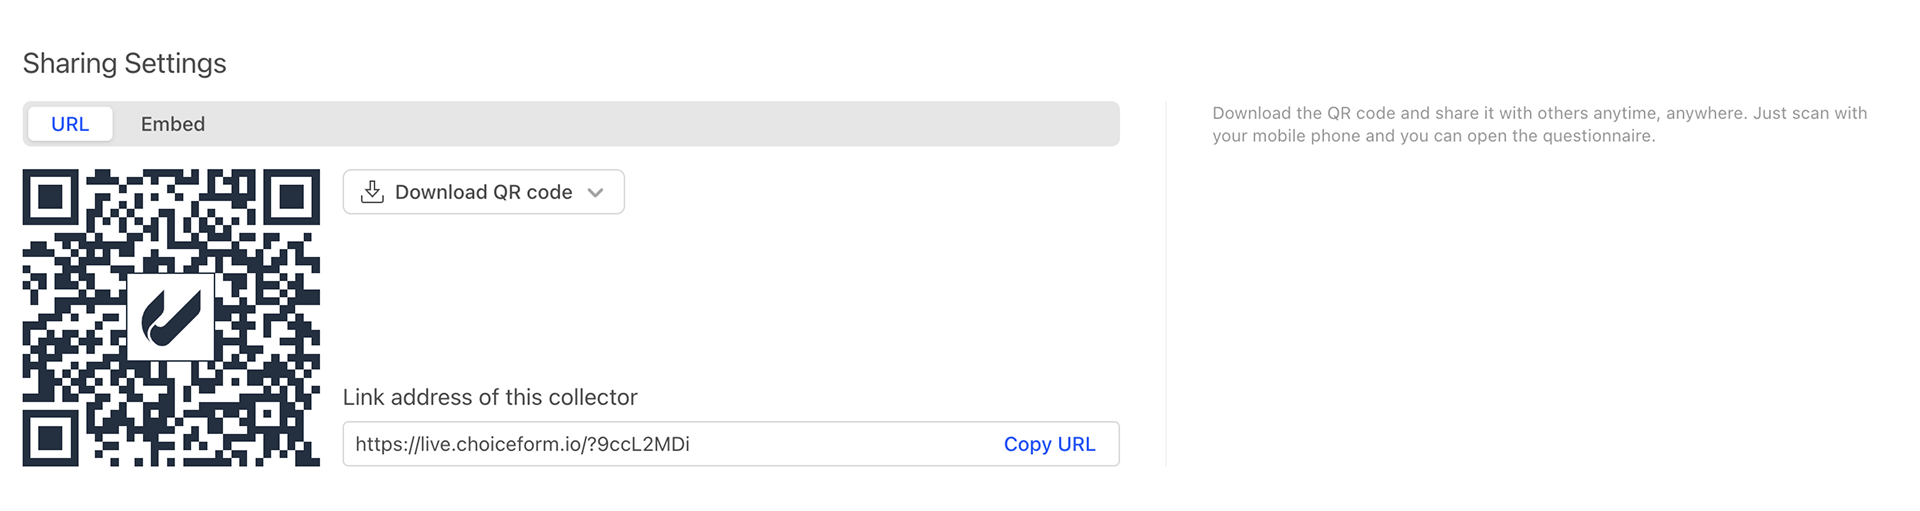
Click to download the QR code in either PNG or SVG format.
Embedded Code
The system can automatically generate code for embedding the questionnaire on a website. Click on "Embedded Code" to set it up.
Standard Embedded Questionnaire
Standard embedding allows the questionnaire to be directly embedded into a webpage. You can set the width and height of the embedded questionnaire.
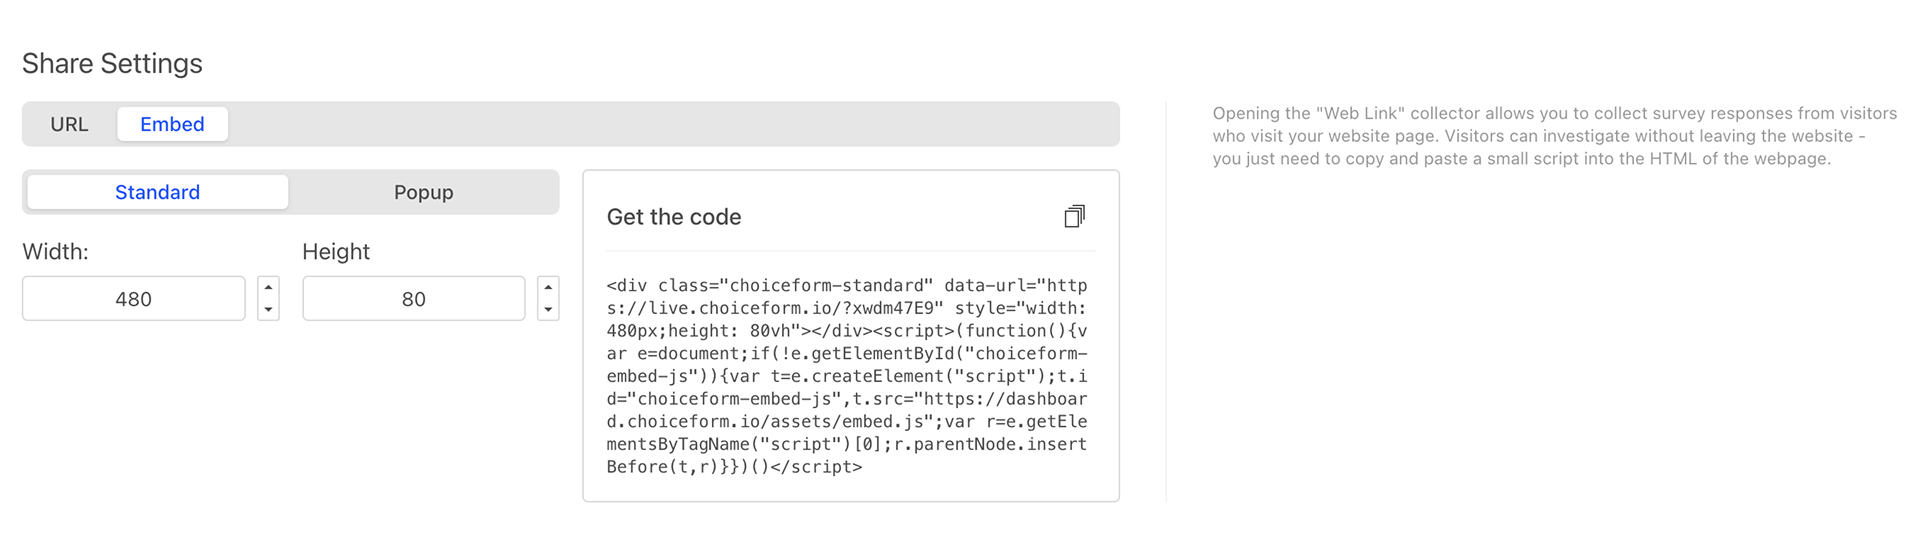
After configuring the settings, the system will automatically generate the code. Click the "Copy Code" button in the top right corner of the code area and paste it into your website code to embed the questionnaire.
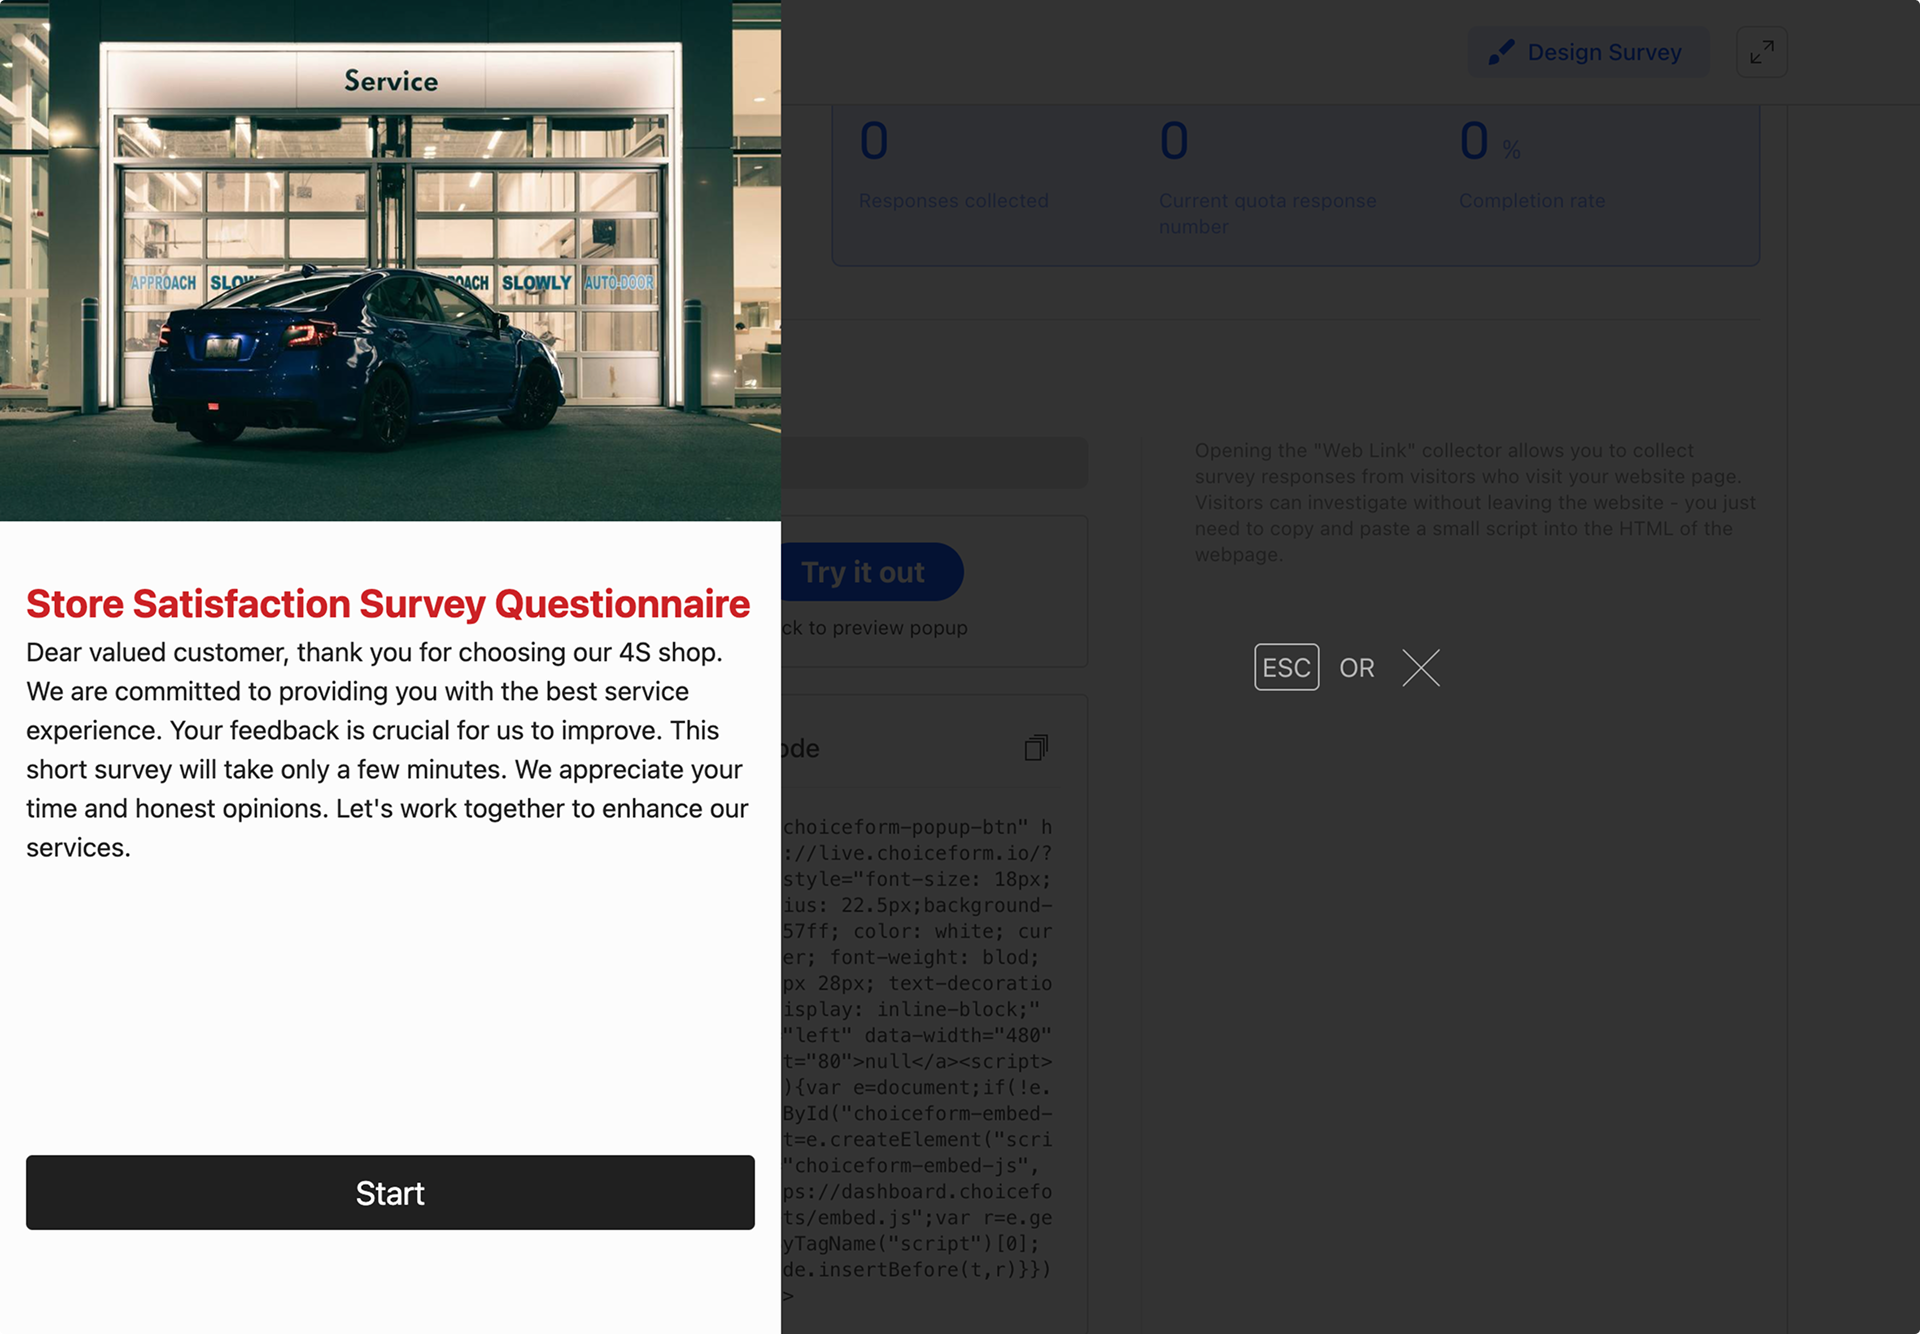
Popup Embedded Questionnaire
Popup embedding adds a button to the webpage. Clicking the button will overlay the questionnaire on top of the webpage without affecting the webpage layout, while still enabling questionnaire access.
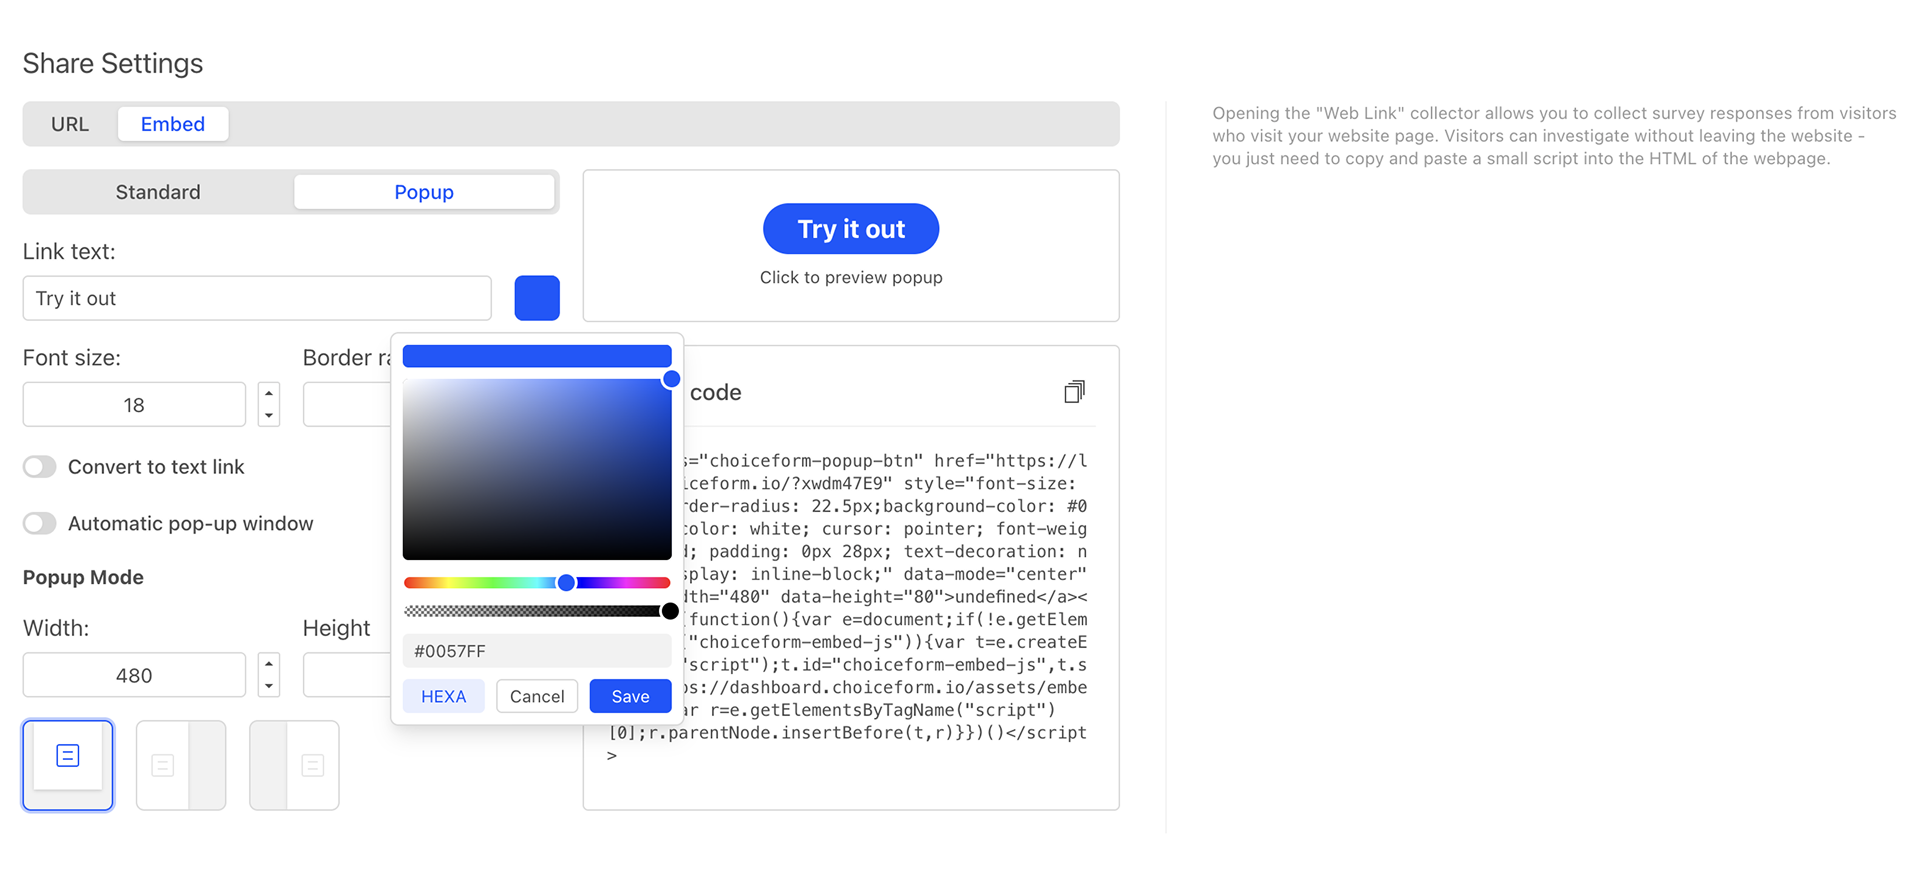
- Link Text and Color: Set the button prompt text and button color;
- Font Size: Set the size of the button text;
- Popup Mode: Set the width and height of the questionnaire, as well as the position of the popup, with options for centering, aligning to the left, or aligning to the right.
- Close Window After Submission: Automatically close the popup after submitting the questionnaire.
After adjusting the settings, you can click "Preview" to experience the final effect.
Once the settings are complete, the system will automatically generate the code. Click the "Copy Code" button in the top right corner of the code area and paste it into your website code to embed the questionnaire.
Estimation
After designing the questionnaire, the system will estimate its difficulty based on big data analysis of historical questionnaire response times, considering factors such as the number of questions, number of options, question types, etc., to score and rate the questionnaire difficulty, providing a reference for determining project execution strategies.
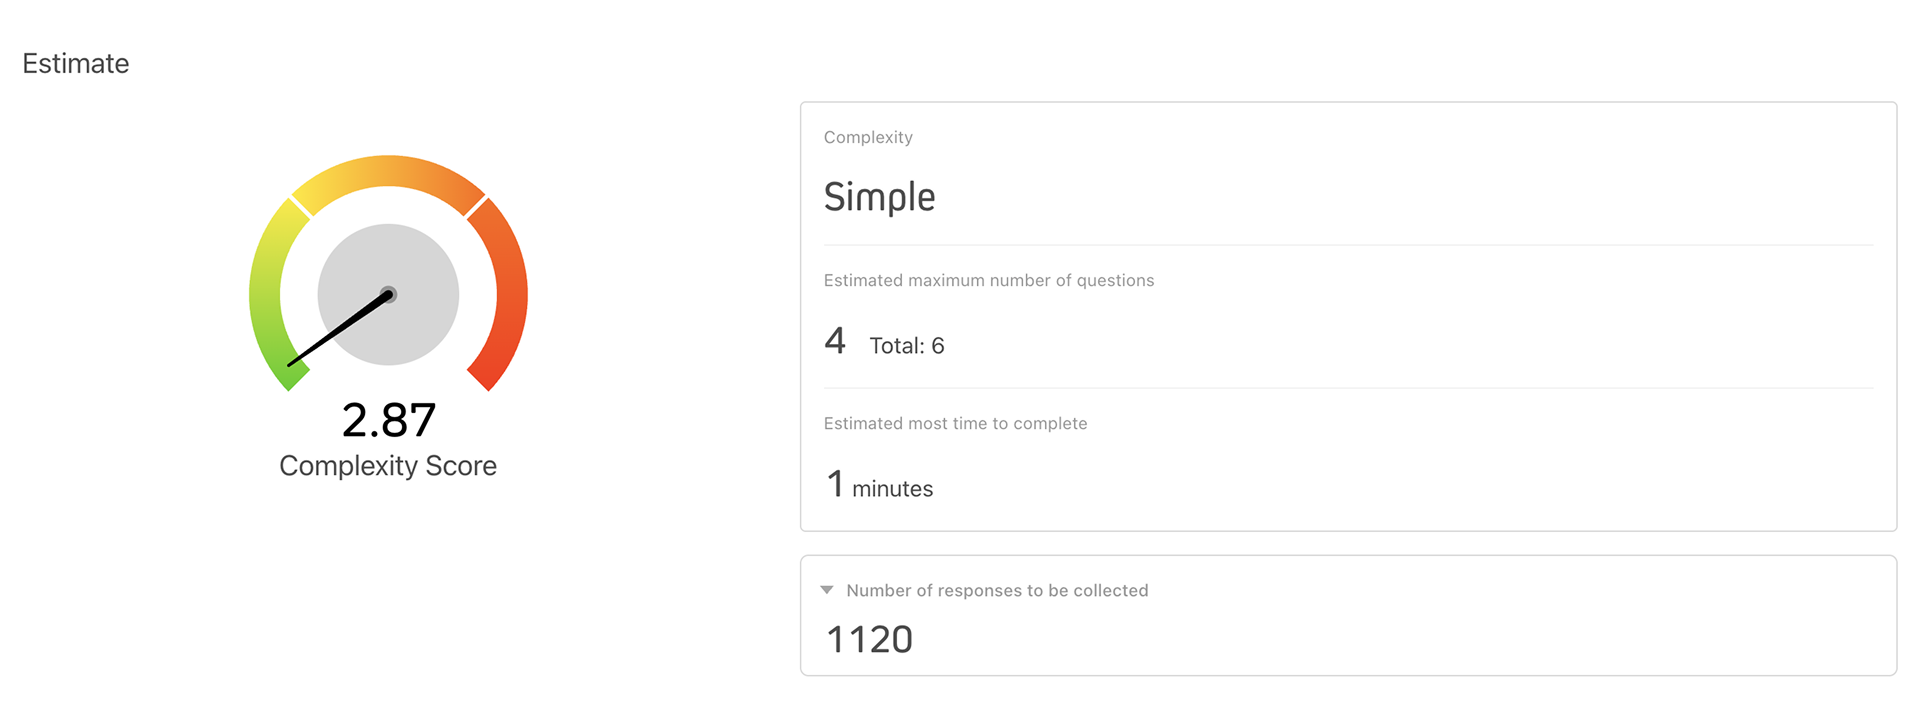
Complexity Score
The questionnaire complexity is scored and presented in a code table format. The complexity is not limited to 100 points, and it is entirely possible to exceed 100 points as the questionnaire becomes more complex. Additionally, the system analyzes the number of questions respondents may need to complete in extreme cases and the potential time required, providing a reference for users to improve questionnaire design and optimize distribution strategies.
Complexity
Intelligently evaluates and scores the overall complexity of the questionnaire.
Estimated Maximum Number of Questions
Analyzes the maximum number of questionnaire questions respondents will answer based on the questionnaire content.
- Total Questions: The total number of questions in the questionnaire, including the start and end pages.
Estimated most time to complete
The maximum time estimated by the system to complete the questionnaire.
Date and Time Restrictions
Before publishing the questionnaire, you need to set a deadline for stopping data collection. After the time limit is reached, the collector will automatically stop collecting questionnaire data.

No Date and Time Restrictions
Continue to receive response data until the collector is manually closed.
Deadline Date and Time
Set a questionnaire deadline; the collector will automatically close upon reaching the preset date.
Multiple Resplies
Used to control whether multiple resplies to the same questionnaire are allowed on the same device. If the questionnaire includes incentives, it is automatically set to allow only one response per device, prohibiting multiple responses.

- Allow multiple responses to the questionnaire on the same device: On the same device terminal, the same respondent can respond to the questionnaire multiple times.
- Restrict multiple responses to the questionnaire on the same device: On the same device terminal, the same respondent can only respond once.
Data Request
Used to invoke external system interfaces and transmit data that triggers a specific status when that status is triggered. ![]()
Add Request
Add a data request. ![]()
Request Name
The name of the current data request.
Request Method
Select the request method from the dropdown list. Options include Post and Put.
Select the Status to be filtered
Select the request trigger event from the dropdown list.
- Quota Full: Response exceeds the set quota.
- Screening Out: Screening response is unqualified.
- Complete: Response completed.
- Invalid Data: Rresponse is unqualified.
URL
The URL link called when the selected state is triggered.
Webhook Trigger Events
A Webhook is a lightweight event-handling application that is invoked immediately when a specified event occurs. 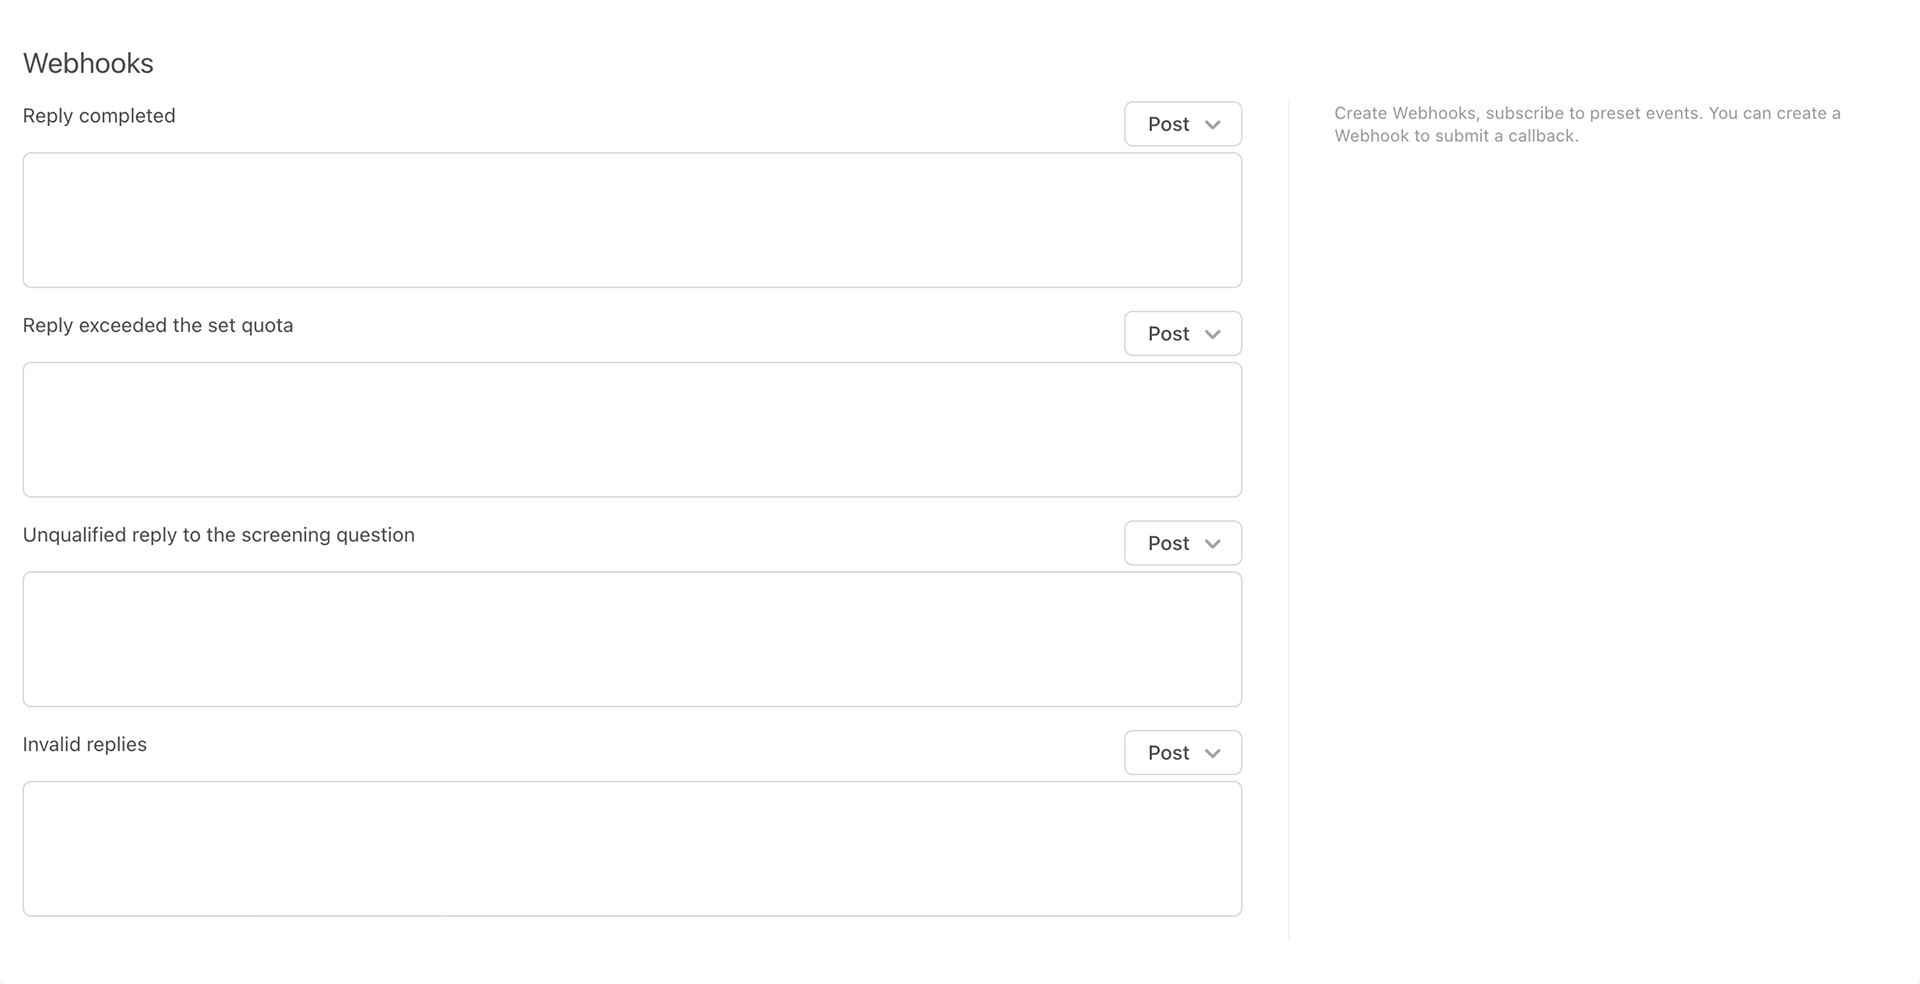
Each collector in the system supports Webhooks, which invoke preconfigured addresses and pass parameters when specified events are triggered. The Webhook configuration area includes three input boxes for filling in the callback addresses for the following four event triggers:
- Reply completed: Triggered when a respondent completes the survey and submits their responses.
- Replay exceeded the set quota: When a respondent completes the screening questions and begins the main survey content, the system checks if there are remaining quotas for that respondent. If quotas are available, the respondent can continue with the survey; otherwise, this event is triggered.
- Unqualified repley to the screening question: Triggered when a respondent fails the screening questions.
- Invalid replies: Triggered when a respondent who has passed screening is found to be answering the main survey questions haphazardly, rendering their survey data completely useless. When such a respondent ends their survey, the "Invalid Response" event is triggered, and the configured interface is invoked. Typically, such data can affect data analysis results. By enabling the "Do Not Record Responses" switch on the survey end page, the system will discard the respondent's response data directly upon encountering such data submission requests. This is usually used to notify the sample database that the respondent's data is unqualified, while the system does not record their submitted invalid data.
Webhook Invocation Methods
Webhooks support three different invocation methods: 
- POST After an event occurs, this interface is invoked in the frontend using the POST method, with the request parameters placed in the body of the HttpRequest.
- GET After an event occurs, this interface is invoked in the frontend using the GET method, with parameters appended to the end of the URL.
- Redirect After an event occurs, a direct redirect to the specified URL page is performed.
You can set the invocation method for each event in the dropdown menu and then fill in the invocation address in the input box.
Inject Variables into URLs
Variables can also be injected into URLs using the {{varName}} format, including explicit variables and system variables from the survey editor.
For example, if a survey link includes an employee name parameter and the survey content requires entering an employee ID, in the Webhook, you may want to pass both the employee ID and name.
Assuming the employee's name is "Lucy," and the employee name is injected through a "key1" parameter appended to the survey link, the format might be: [Survey Link]?key1="lucy". The target Webhook address is: https://www.choiceform.com.
In this case, two variables need to be injected: var1 and key1:
- var1: This is an explicit variable. To inject it, ensure that a variable named var1 has been created in the survey editor, which corresponds to a survey question prompting the input of the employee ID.
- key1: key1 is a built-in URL parameter variable in the survey editor. When the respondent opens the survey page, the values of these variables are parsed.
Based on the above, the final Webhook address should be: https://www.choiceform.com?number={{var1}}\&name={{key1}}.
When respondent "Lucy" completes the survey, key1 is parsed as "Lucy," and if she enters the employee ID "0001," var1 is parsed as "0001." The final redirected address will be: https://www.choiceform.com?number=0001\&name=lucy.