Data Grid
Data Grid
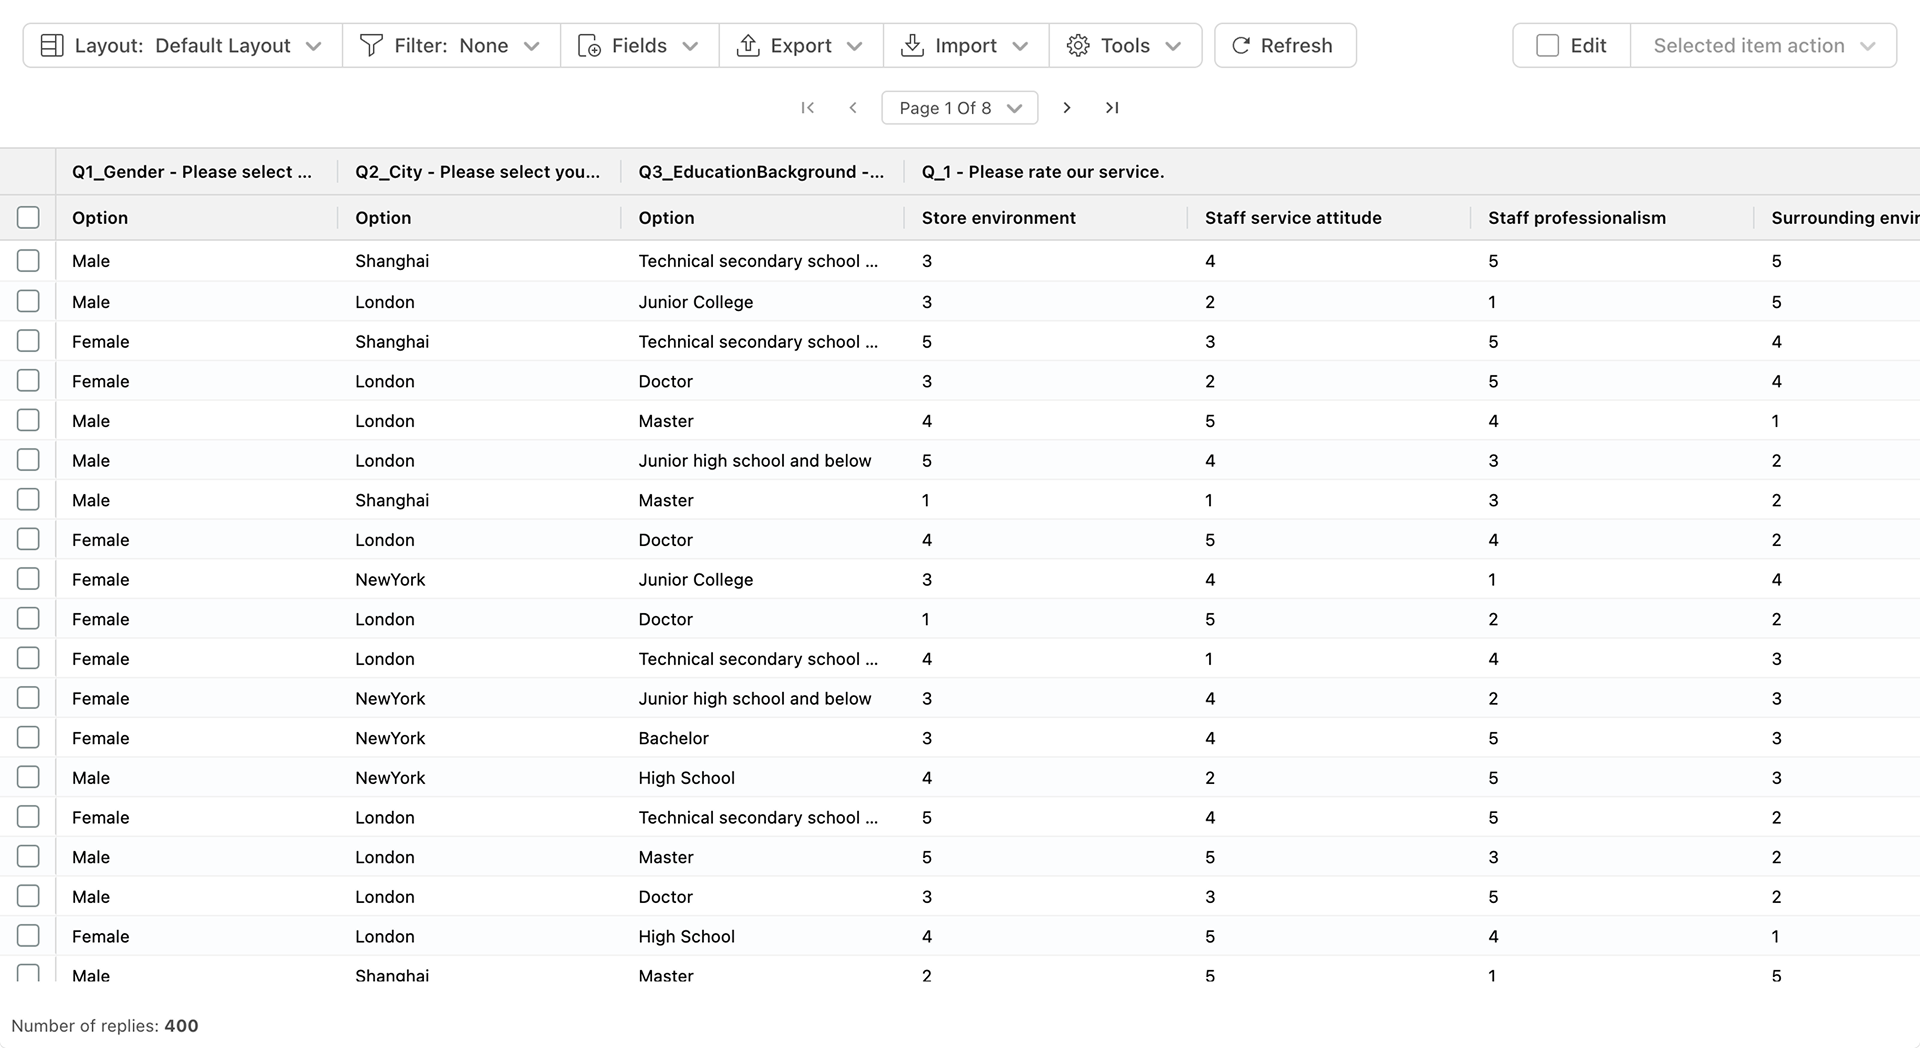
The data table visually presents the data collected from the questionnaire in a tabular format, making it easy for users to quickly browse and understand the data content. It supports direct editing, modifying, and updating of data within the table, improving the efficiency of data management. It also allows exporting the table data into various formats (such as Excel, CSV, SPSS) for further analysis or sharing.
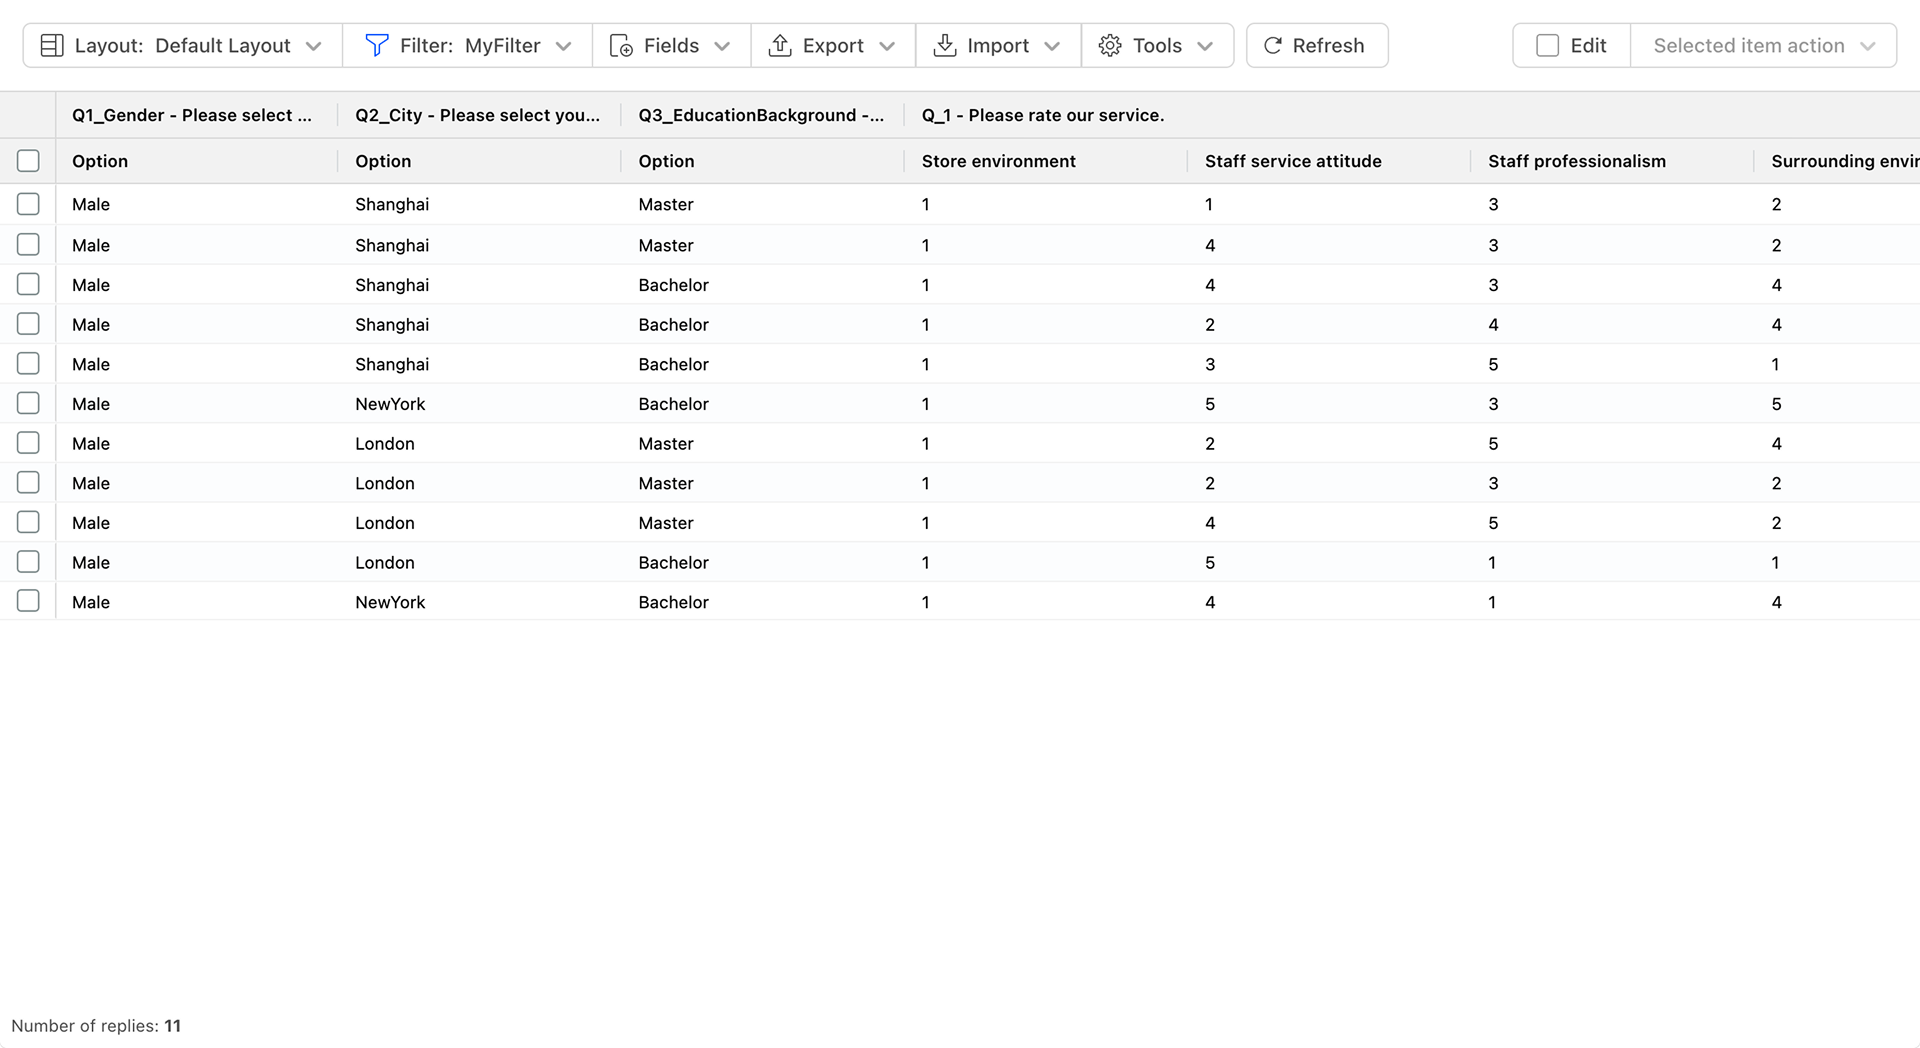
After the questionnaire collects data, the system will display the questionnaire data according to the default question order. Each column in the data table corresponds to a questionnaire question, and each row corresponds to a response data entry. All data from the current questionnaire will be displayed in tabular form on the page.
Click on the data column header to set the sorting order for the current column. Supported sorting options include:
- Sort A-Z: Arrange the current column data in ascending alphabetical order.
- Sort Z-A: Arrange the current column data in descending alphabetical order.
Data Grid Layout
The first few columns of the data grid contain meta-information, including:
- Submit ID
- Status
- User ID
- User Union ID
- Username
- Channel
- Start Time
- Submission Time
- IP
- Time Consuming
- URL Parameters
- Collector
The top two gray rows represent the questionnaire questions and their options, with the collected data displayed in the table cells corresponding to the headers.
Users can adjust the layout of the data grid and save it as a custom data grid layout to meet personalized data arrangement needs.
Create New Layout
Create a new custom data grid layout.
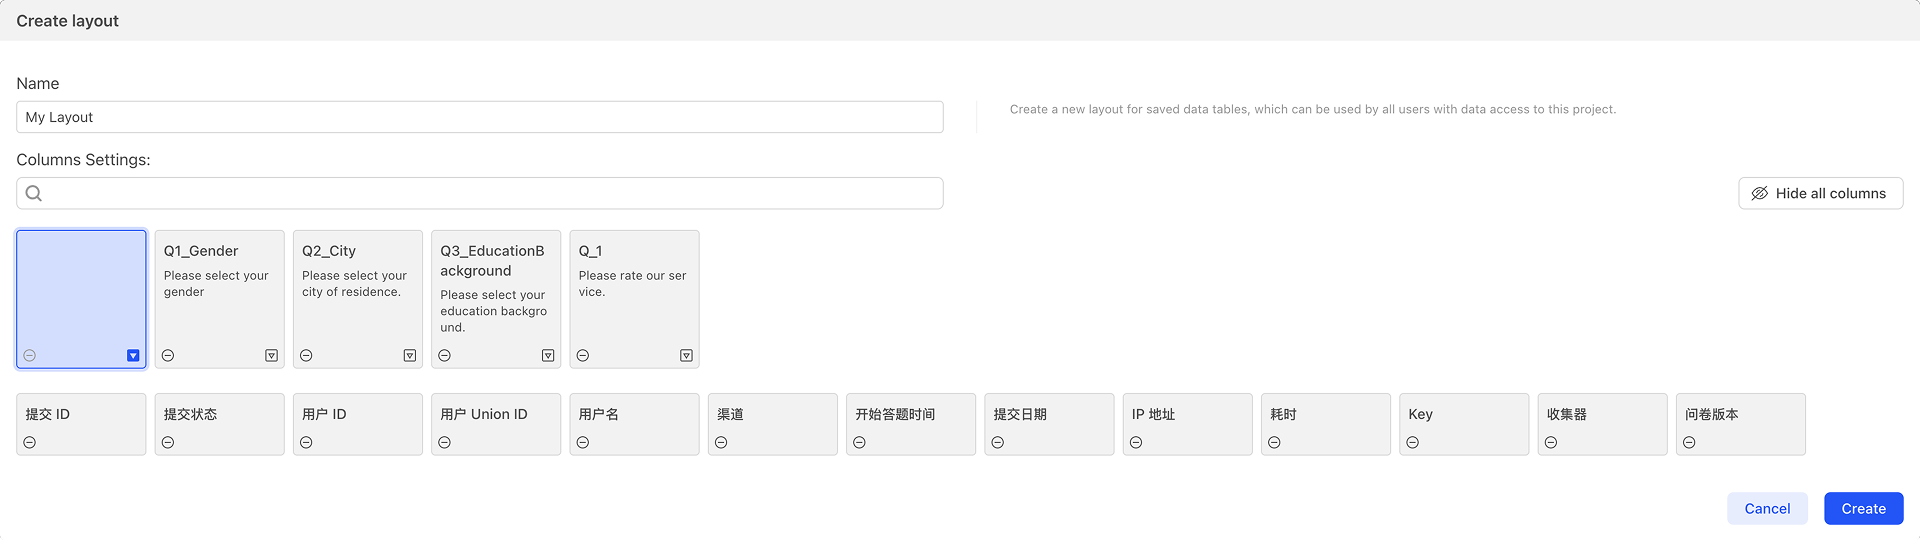
Layout Name
Set the name for the current layout.
Column Settings
Configure the arrangement rules for the current layout columns.
- Add Column Click the "Add Column" button and select the desired question from the pop-up menu to add a question data column card.
Click the "+" button in the top-left or top-right corner of the question data column card, and select a questionnaire question from the pop-up menu to insert the selected question data column to the left or right of the current card. The left-right order of the data column cards represents the final order of the data columns in the data grid.
-
Remove Column Click the "-" button in the bottom-left corner of the question data column card to remove the current card.
-
Add Questionnaire Question Options Click the triangular button in the bottom-right corner of the question data column card to add all options for that questionnaire question below the current card and generate an option data column card for each option, with each card corresponding to a column of option data.
The operations for option data column cards are the same as those for data column cards.
-
Show All Columns Display all data columns for the questionnaire. You can first display all data columns and then remove the ones you don't need one by one to achieve the desired data grid layout.
-
Hide All Columns Hide all data columns for the questionnaire. You can first hide all data columns and then add the ones you need one by one to achieve the desired data grid layout.
Use Data Grid Layout
After saving the layout, click the layout button and select different data grid layouts from the pop-up menu.
Manage Layouts
Edit or delete specified, unused data grid layouts.
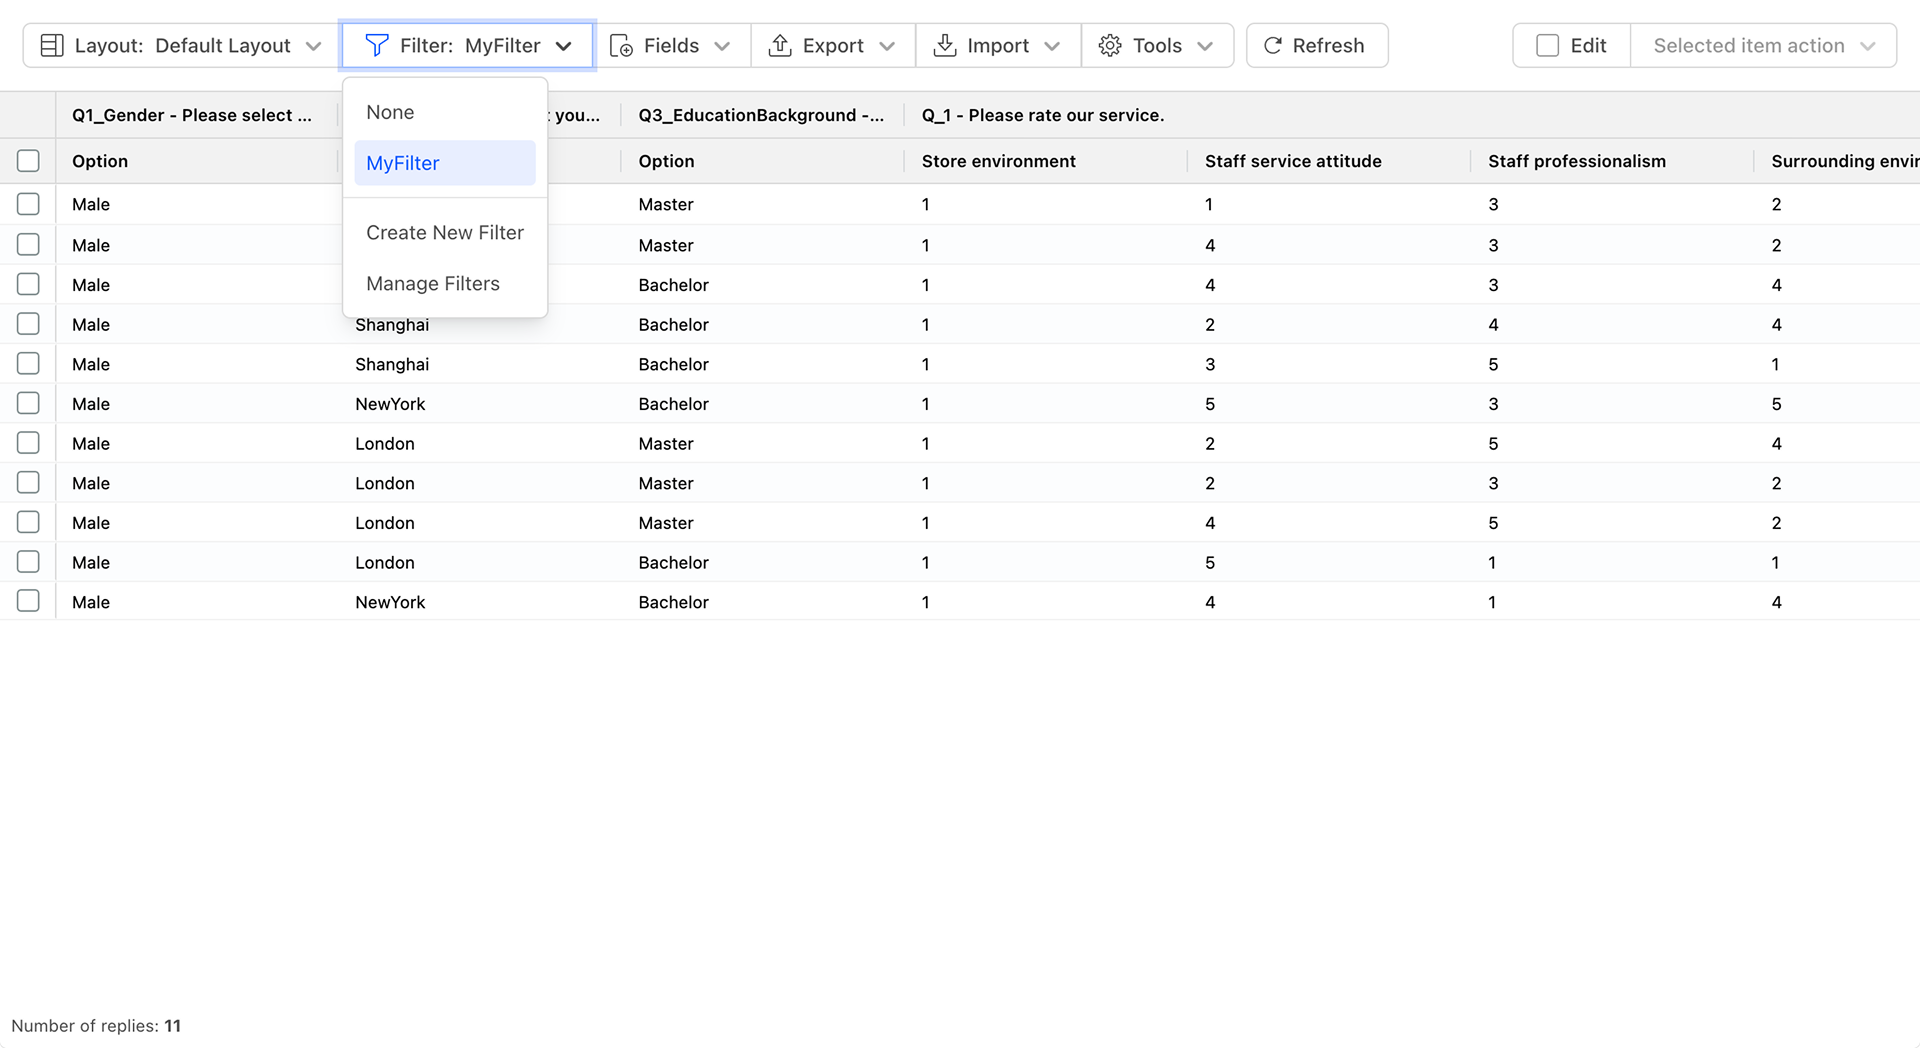
Filter
By default, the data grid includes all collected data. Use filters to screen the result data and display only the specific data that users are interested in.
Create New Filter
Click the filter button, select "Create New Filter" from the pop-up menu, and open the Manage Filters dialog box.
Edit Filter
Name
Set the name for the filter.
Delete Filter
Click the delete button to the right of the filter name to delete the filter.
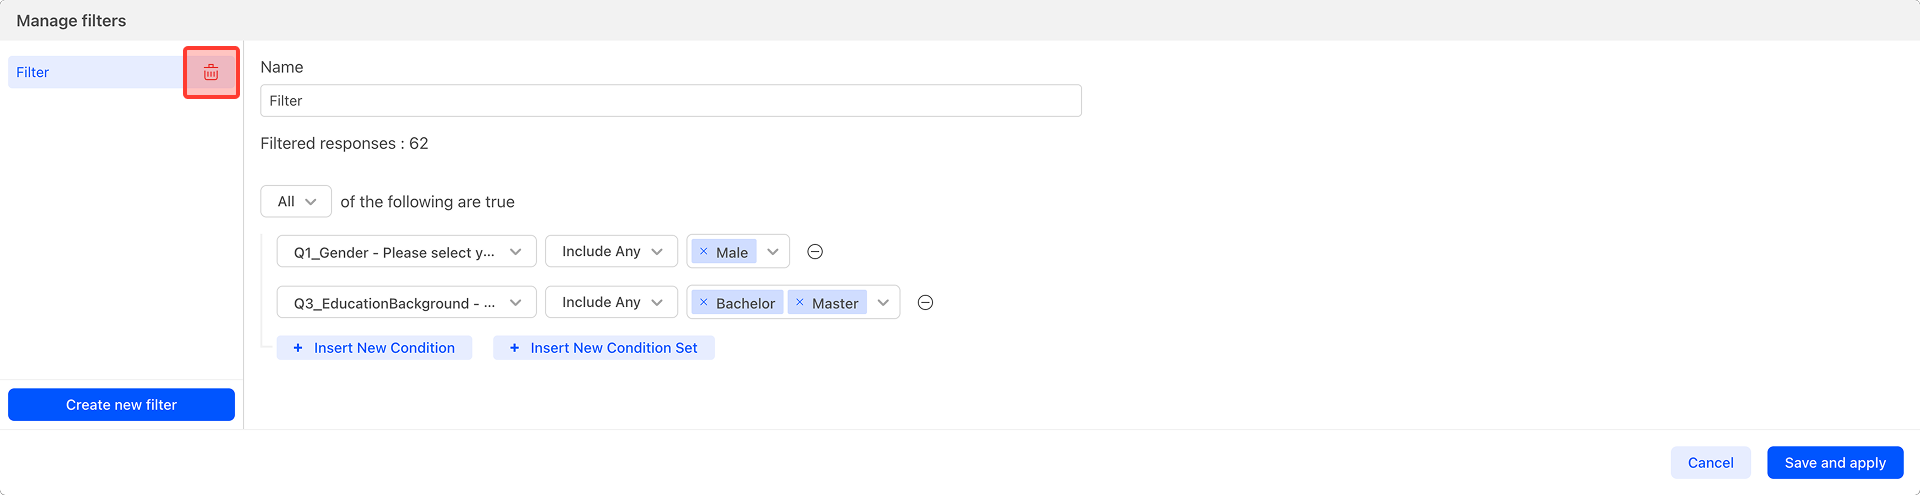
Set Data Filter
The highlighted area in the figure below is the data filter condition editor.
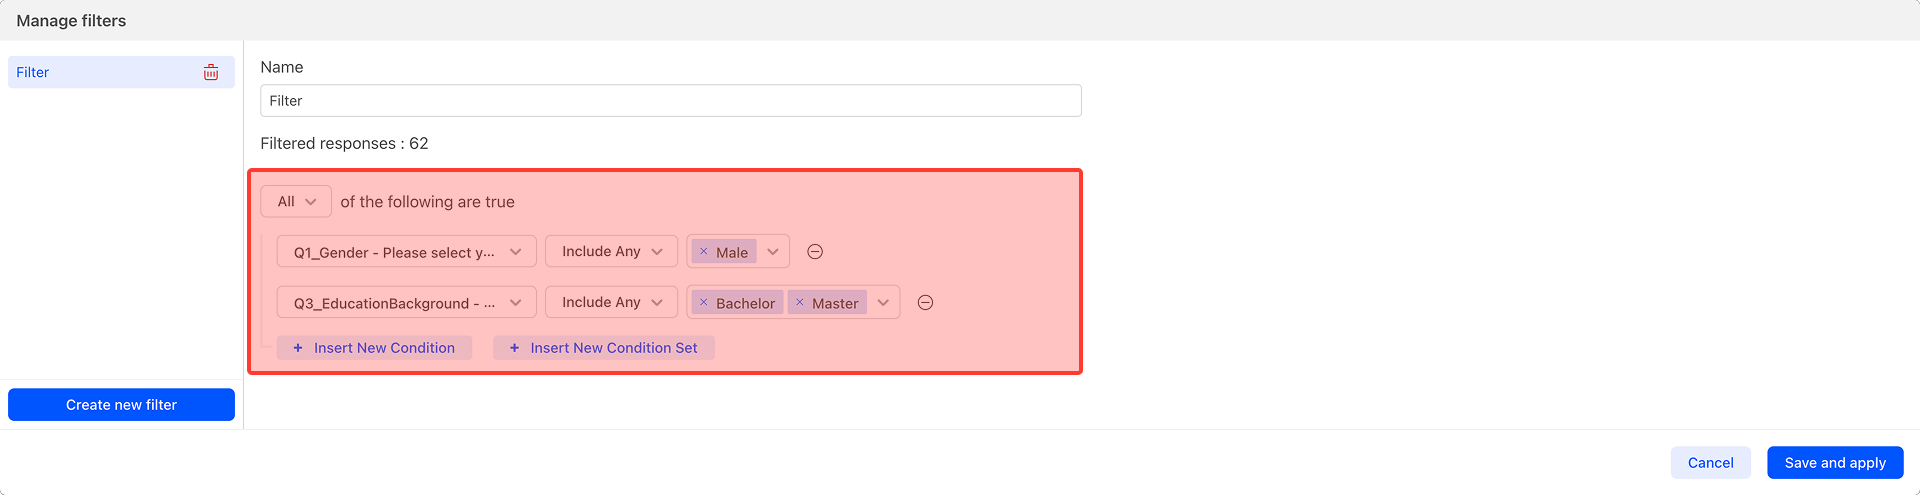
In the figure, two data filter condition settings have been added, which are:
- The answer to the question about the number of passengers in the car during a trip contains "1-2 people".
- The answer to the question about spare time activities contains "chess and card games".
The logical operation for the above two condition settings is "All are correct", corresponding to the And logical operation. Click the menu to switch to "Any one is correct", corresponding to the Or logical operation.
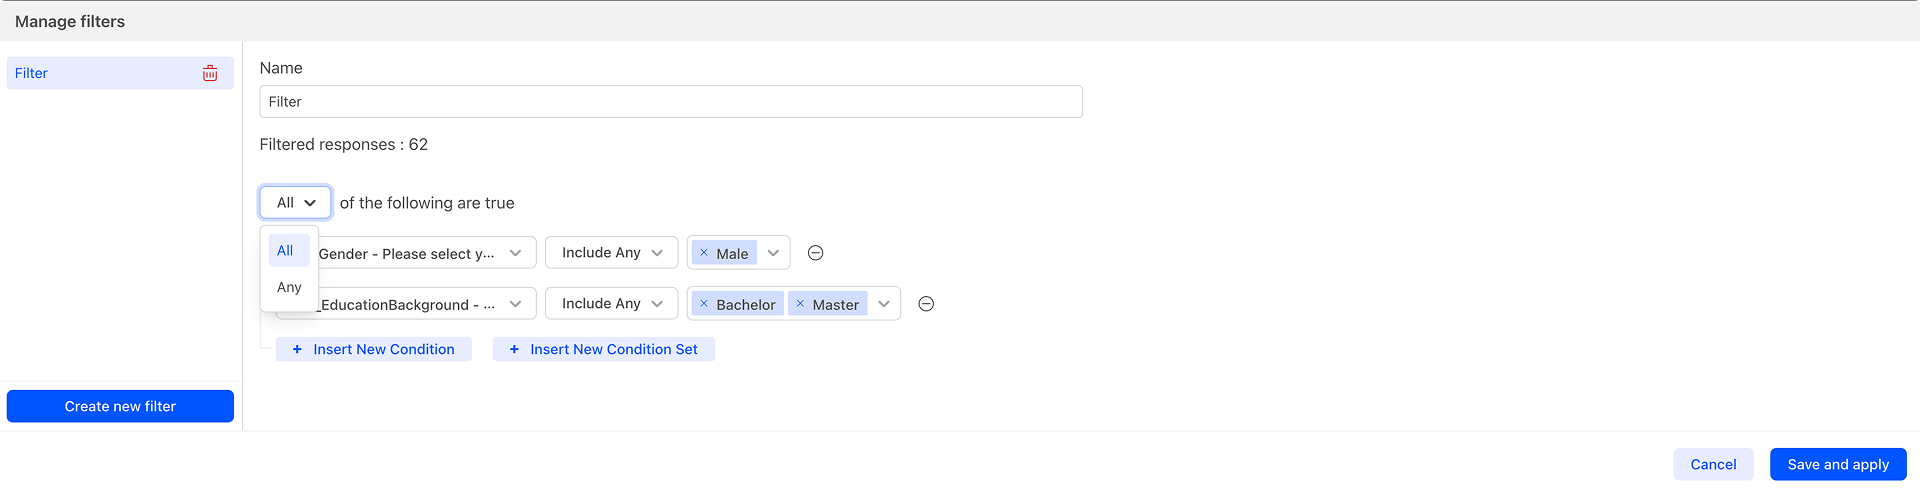 The above two conditions and the operation mode constitute a data filter condition set.
Insert New Condition
src='./media/2302DataGrid/addDataFilterCondition.png'> Click to select a question, and choose the question from the pop-up menu for which you want to filter data. After selection, click the operation button to the right of the question, and select the data judgment operation from the pop-up menu.
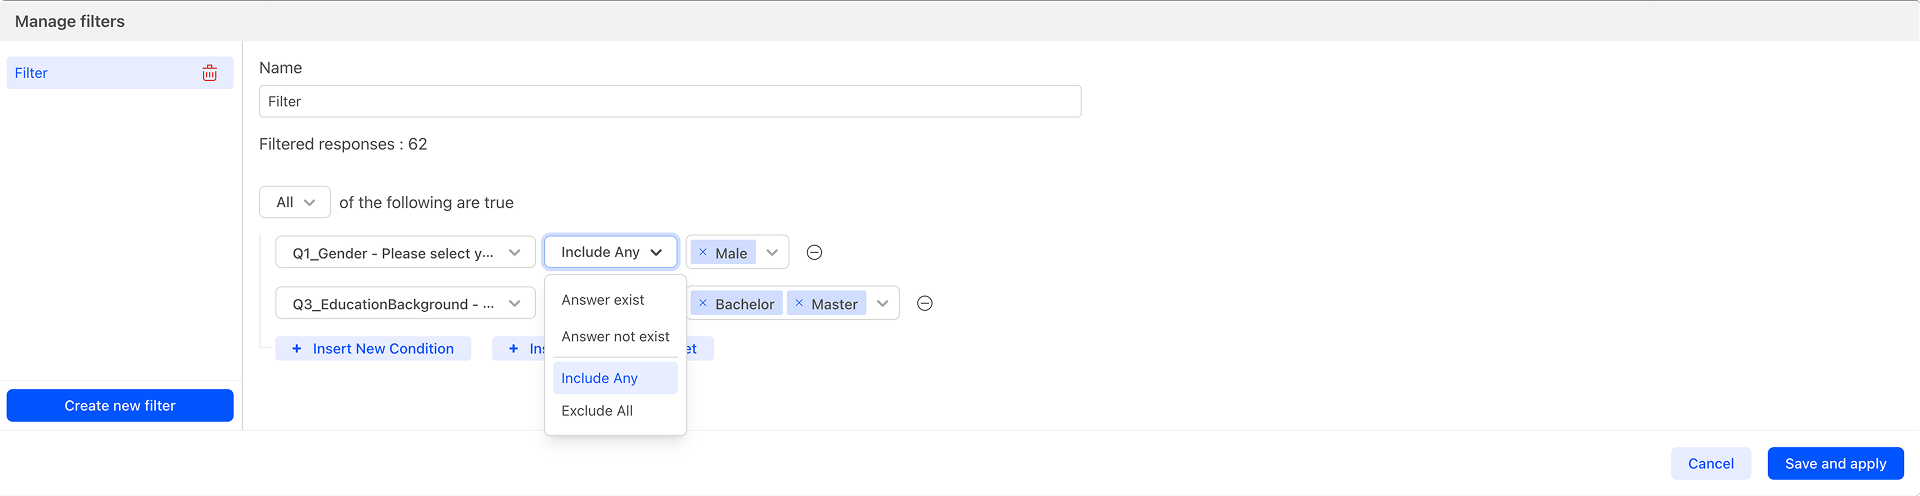
The available data judgment operations include:
- Answer exist
- Answer not exist
- Include any
- Exclude all
- Include: Contains the specified text
- Exclude: Does not contain the specified text
- Has prefix: Begins with the specified prefix
- Has suffix: Ends with the specified suffix
Set these in sequence to complete the addition of a new data filtering condition.
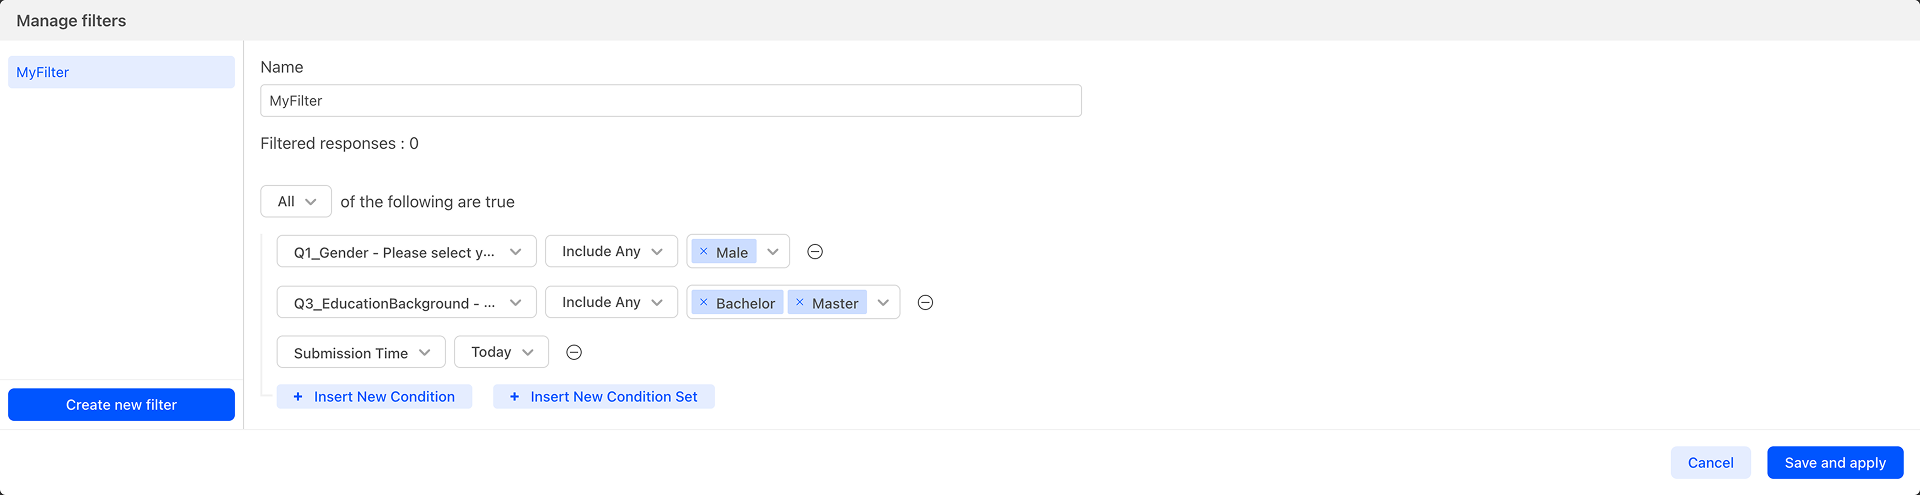
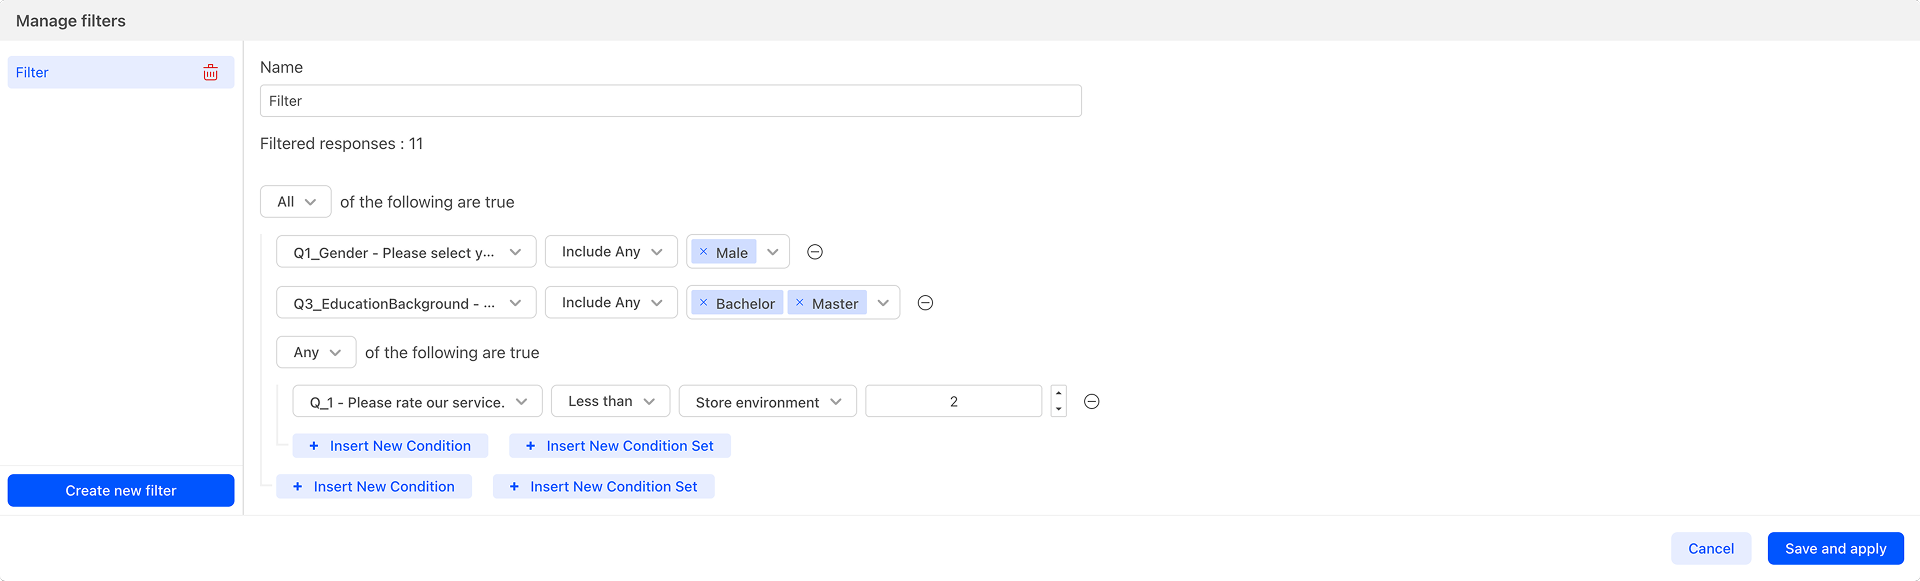
Insert New Condition Set
Add a new condition set within the current set of conditions.

Delete Data Filtering Condition and Condition Set
Click the "-" button on the far right of the data filtering condition or condition set to delete the current condition.
Save and Apply
Save the data filter, automatically filter the data, and display the resulting data that meets the criteria.
Switch Filters
Select and switch filters in the pop-up menu to filter data.
Manage Filters
Edit or delete specified, unused data filters.
Fields
Create Custom Fields
Manual
Manually create a new field for the data table. The system supports four types of manually created fields, which are:
- Text: Add a text field to the data table, similar to the input content of a fill-in-the-blank question.
- Numeric: Add a numeric field to the data table, supporting both integers and decimals.
- Date: Add a date field to the data table.
- Tags: Add a tag field to the data table, and set the available options for the tags field upon creation, similar to a multiple-choice question.
Grouping
During the initial stage of data processing, it is used to categorize and merge fields that meet certain criteria, and to assign a new name to the resultant field.
Formula
Perform numerical calculations on options with specific values, supporting basic arithmetic operations such as addition, subtraction, multiplication, and division. Currently, it supports score calculation for graded questions but cannot compute the values entered in fill-in-the-blank questions.
Logic
Set logical judgment conditions for specified fields. The system automatically analyzes each piece of data and adds corresponding text labels to the logical field results based on these conditions, typically enabling batch labeling of the data.
Manage Custom Fields
- Edit: Modify the settings of a custom field.
- Delete: Remove a custom field and its associated data.
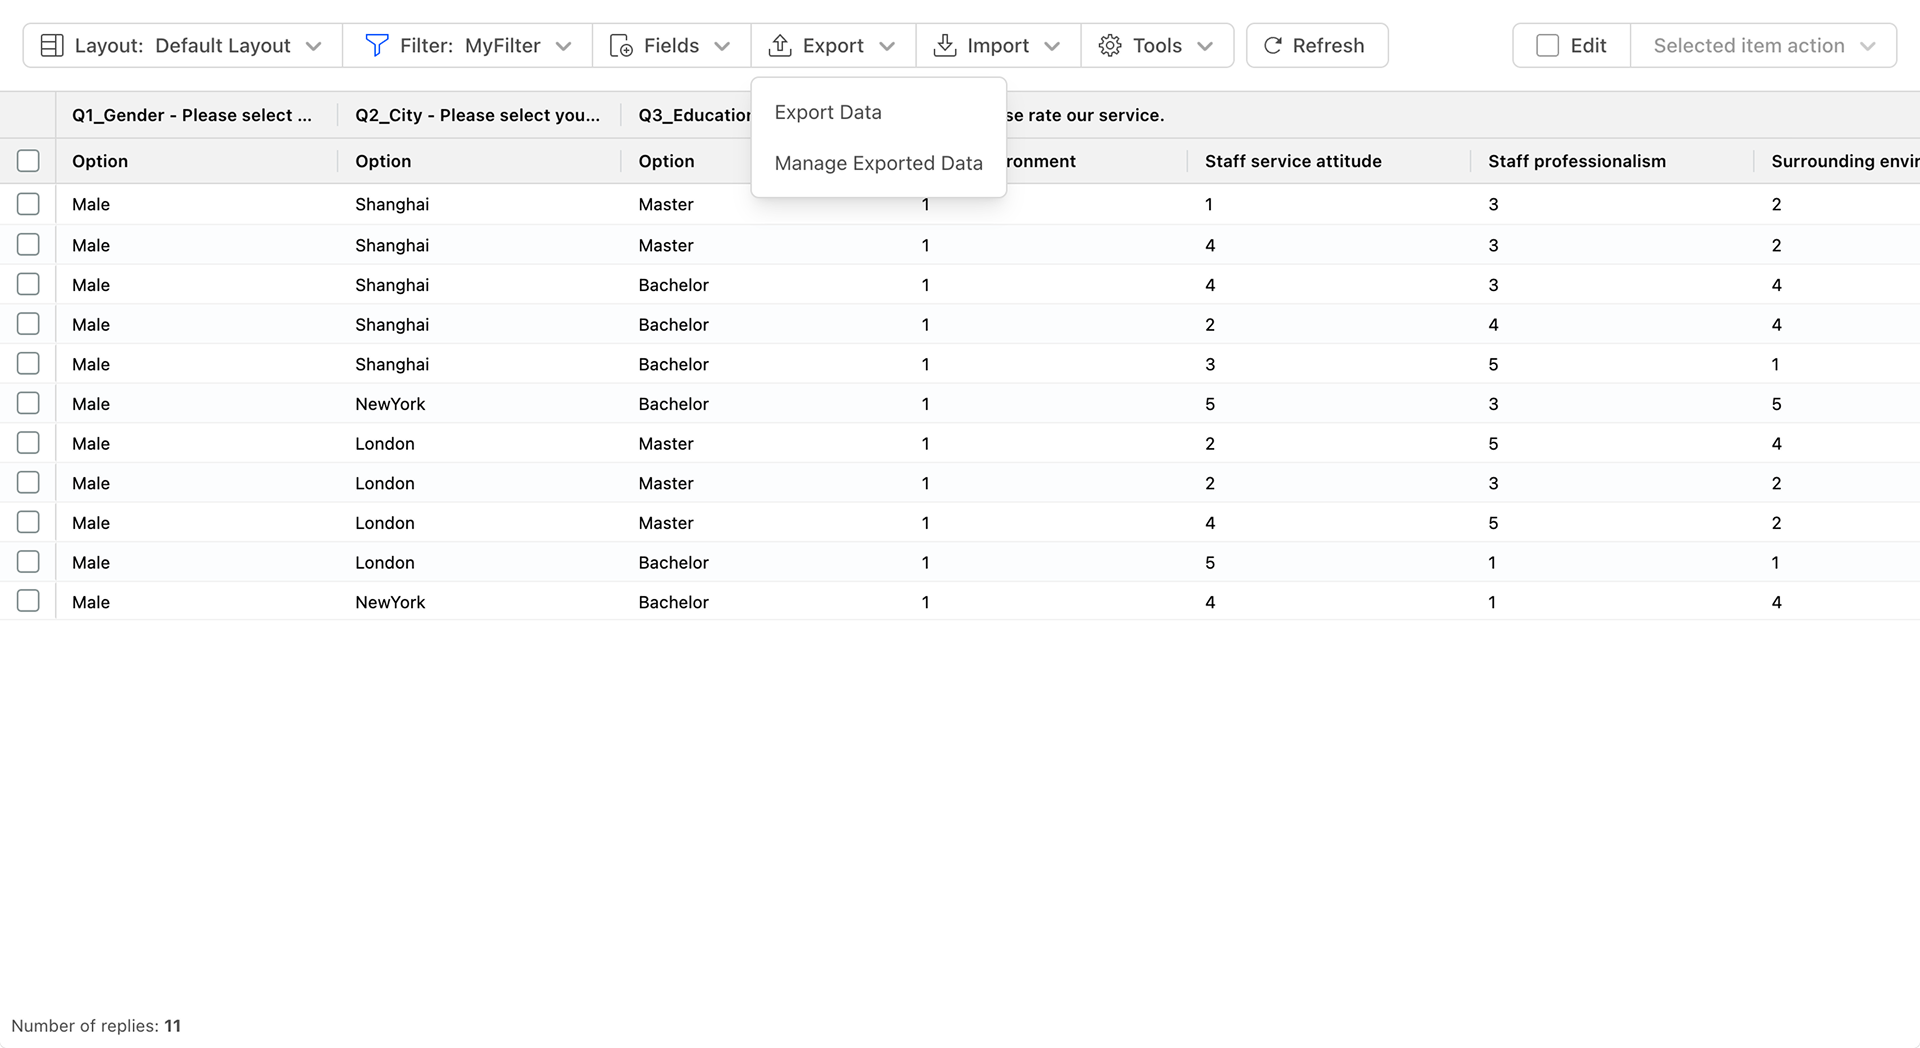
Export
Export Data
Click on Export and set the options in the Export Data dialog box.
The available data export formats include:
- CSV
- XLSX
- TSV
- SPSS
The available data file formats include:
- Option Content
- Option Label
The available statuses include:
- Complete
- Screening Out
- Quota Full
- Invalid Data
- Deleted
- Created
- Under Screening
- Screening Passed
- Submitting
- Test Data
- Overflow Data
Data file name: Name of data file.

Scope of Exported Data
The data filtering criteria of the current data grid will affect the scope of the exported data. When no data filtering criteria are applied, all data will be exported; otherwise, only the questionnaire data that meets the data filtering criteria will be exported.
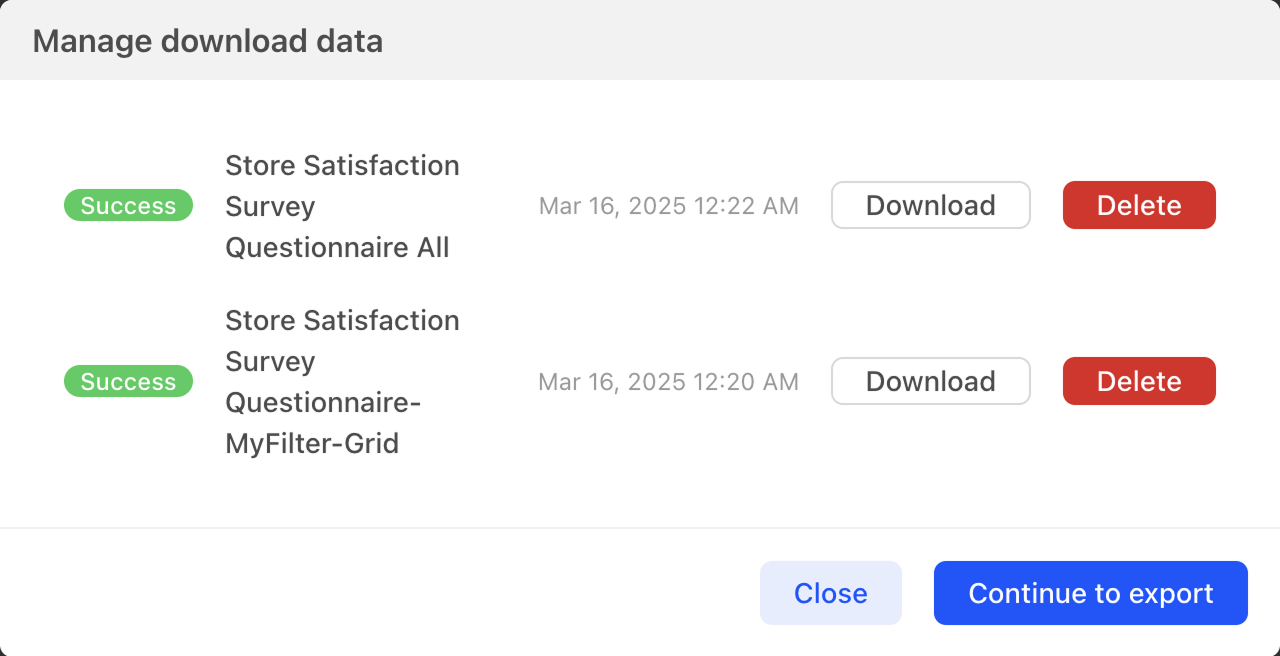
Manage Exported Data
Download or delete specified data resources. When the exported questionnaire includes file resources uploaded by respondents, such as images, the system will compress and package the questionnaire's file resources, storing every 3000 file resources in one ZIP file.
Download Questionnaire Data
After data export, corresponding data resources are created in the cloud. In the Manage Exported Data dialog, all already exported questionnaire data resources are listed. Click the Download Data button to download the specified data resource file.
Import
The system supports importing external data files, but before importing a data file, you should ensure that the headers of the imported data file match the current data table. Typically, it is recommended to first download the import template. The system will generate a blank file that only contains the structure of the data table headers but no data, based on the current data table. Then, you can fill in the data in this file and upload it to the system.
Import Data
In the pop-up window, select the data file you need to import. The system will import the data from the file and merge it into the current data table. The imported data will be marked with "Imported" in the collector field of the data table for distinction.
Manage Imported Data
After importing data, the system will record each import and display it in a list. When these imported data are no longer needed, you can click the withdraw button next to the import record, and the system will delete the corresponding imported data from the current data table.
Download Import Template
Download the data table structure of the current questionnaire. After filling in the data in this table, users can upload it to the system, and the system will import the data into the data table according to the format.
After importing, you need to manually click "Refresh Table" to load the latest imported data.
Tools
Generate Test
Open the dialog box to generate test response data.
Select Page Size
Set how many rows of data are displayed in the data grid.
Refresh Table
Reload table data.
Edit
Checking this option enables the data editing function. Switching data pages will reset the selected data.
Modify Questionnaire Response Data
Click on a data grid cell to modify the data.
Selected Item Action
Each row of data has a checkbox in front of it. Checking it selects specific data rows, but switching data pages will reset the selected data.
Delete
Delete the data rows that have been checked in the data grid.
Release quota
Release the quotas occupied by the data rows that have been checked in the data grid.
CSV
Export the data rows that have been checked in the data grid as a CSV file.