Global General Settings - Edit
Global General Settings - Edit
Edit
Question Type Description / Quick Switch Between Question Types
The current type of the question.
After clicking, a dropdown list will pop up showing other question types that can be quickly switched to from the current one, allowing for rapid switching between different types of questions. 
Question Number
The number of the current question.
Focus on the target node
When editing complex surveys, sometimes you may forget where the currently set question is located. Clicking "Focus on the target node" will bring the current question back to the center of the canvas.
Question
The descriptive text and image for the stem of the current question.
Question Content
Enter the textual content of the question. Variable content can be inserted into the text. For example, first ask the respondent what fruits they like, and then follow up with specific reasons why they like that fruit.
Edit Text Style
Click the "T" button in the lower right corner of the question stem text to open the rich text editor and edit the text style.
Add Picture / Video
Enable the media addition switch for the question node to add supplementary images or videos to the current question.
Add Question Picture
Click the image media selector to pop up a list of image resources, displaying all image resources in the current media library. Click on an image resource to select it.
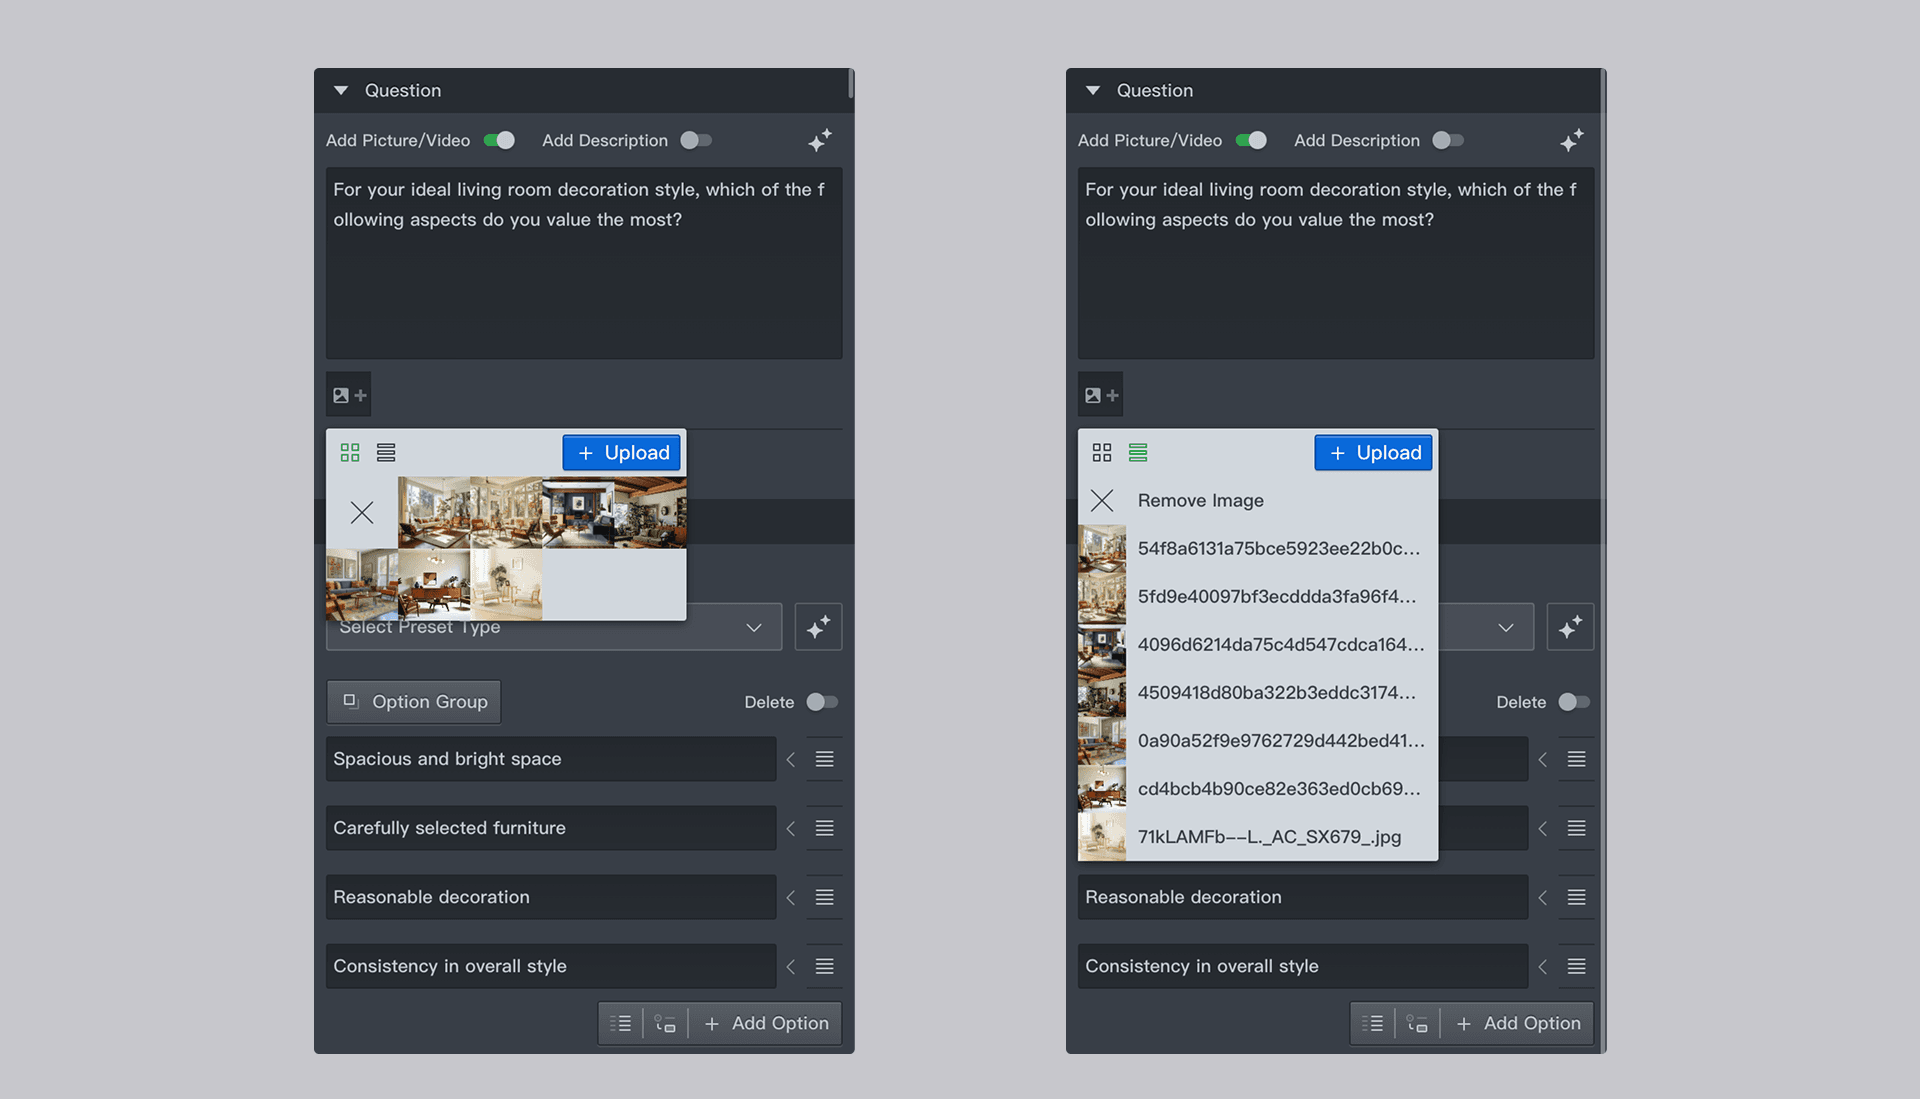
After adding an image, it will be displayed below the survey content as an accompanying image for the current question.

- Upload Picture: If the required image is not yet in the media library, click the upload image button in the top right corner to upload the image and use it directly. At the same time, this image will also be added to the media library.
- Delete Picture: Click the remove image button at the top of the video resource list to remove the current image from the question.
Image Media Control
- Layout: Set the image to display before or after the question.
- Zoom In: Allow the image to be enlarged for display.

When enabled, respondents can click on the image to enter fullscreen mode and zoom in to view the entire image.

Add Question Video
Click the video media selector to pop up a list of video resources, displaying all video resources in the current media library. Click on a video resource to select it.

- Upload Video: If the required video is not yet in the media library, click the upload video button in the top right corner to upload the video and use it directly. At the same time, this video will also be added to the media library.
- Delete Video: Click the remove video button at the top of the video resource list to remove the current video from the question.
Video Media Control

- Full Length Play: Respondents must watch the entire video before proceeding to the next question.
- Auto Play: Automatically play the video when the question is accessed.
Due to the widespread phenomenon of deep customization in mobile ecosystems, auto-play may not work on some customized mobile systems.
Add Description
Add supplementary descriptive text under the current question content.
Option
Set the options for the current question. The options and corresponding properties will vary depending on the type of question.
Preset Type
The system presets some commonly used option contents. Simply click on the preset in the dropdown list to generate the corresponding option directly. The current predefined options include**:
- Gender
- Age
- Marital Status
- Educational Background
- Industry
- Occupation
- Position
- Income
- Agree/Disagree
- Satisfy/Dissatisfy
- Yes/No
- Possible/Impossible
- Familiarity
- Appropriateness
- Moderate Amount
- Interest
- Easy/Difficult
- Always/Never
- Better/Worse
- Approve/Disapprove
- Average
- Quality
- True/False
- Intention
- Usefulness
- Value
- Clarity
- Proportion
- Friendliness
Description
Enter the option text in the input box.
Add Option
Add a new option below the current options.
Delete Option
Turn on the delete switch in the top right corner of the option list. The drag icons on the right side of all options will change to delete icons. Click the delete icon to remove that option.
Option Grouping
Group the options for a question.
- Supports setting group names and controlling whether to display them.
- Supports nested grouping, up to three levels deep.
Randomization Rule
Set a randomization rule for the current option group, which will randomly arrange the order of all options within the group.

- Supports individual random sorting control for options within the group.
- Follow Node The randomization of the group follows the randomization setting of the question options, and the randomization setting of the current group will be overridden by the randomization setting of the question options.
- No Randomization The options within the group are arranged in the set order without randomization.
- Randomize Randomly arrange the options within the group.
- Circulate Cycle through the options within the group in the set order. Assuming the order of options is A-B-C-D, with Fixed Position Cycle enabled, the options will be arranged in a fixed sequence such as A-B-C-D, C-D-A-B, B-C-D-A..., without disrupting their relative order.
The randomization setting at the question level can override the randomization setting of the top-level group.
Option Sorting
Each option has a drag icon on the right, which allows you to sort the options by dragging them up or down.
Fixed Position
Fix the current option at the top or bottom, with the default being the order in which the options were created.
Exclusive Setting
In multiple-choice questions, there may be a mutual exclusion relationship between options. When a certain option is selected, specific exclusive options cannot be selected, and this is where the option exclusion setting comes in.
Since there is no possibility of mutual exclusion in single-choice questions, the option exclusion setting is only displayed for multiple-choice questions. After enabling multiple-choice questions, open the option exclusion setting panel by clicking the folded settings arrow on the right of the options. The option exclusion can be set to the following modes:
- N (or Null): Indicates that the option is not exclusive.
- Numeric values from 1 to 99: The numeric value represents a mutual exclusion number. When this option is selected, it will exclude options with the same mutual exclusion number as itself, as well as options set to EXC.
- EXC: Indicates that this option excludes all other options. When this option is selected, all other options are automatically deselected. Conversely, when any other option is selected, this option is also automatically deselected.
Add Input Field
When the "Add Input Field" option is checked, a text input box will appear below the option when the respondent selects it, prompting the respondent to provide additional information.
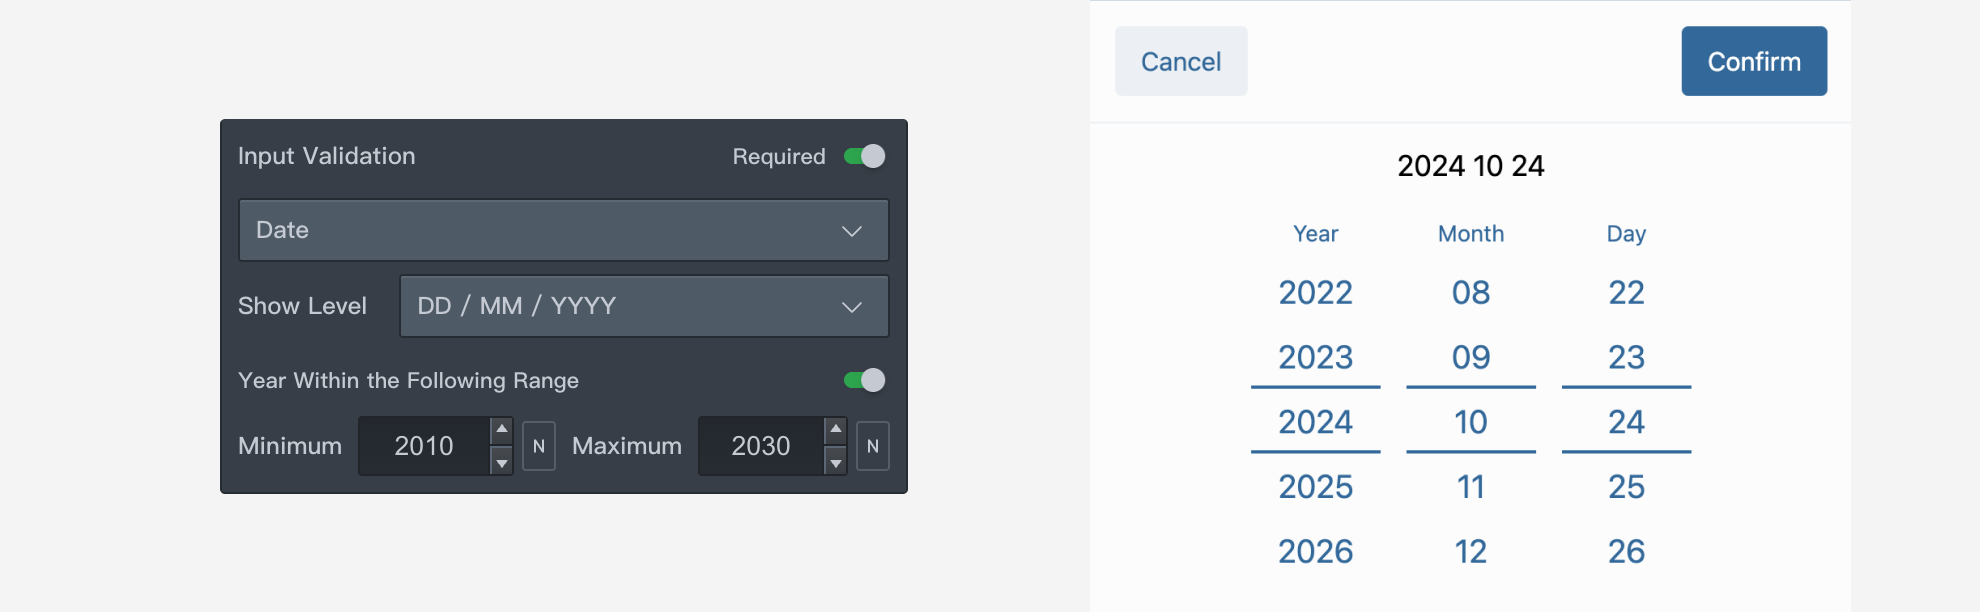
Input Validation
Add input validation rules to places where arbitrary content needs to be entered, such as fill-in-the-blank options and option remark fields, to restrict the input to specified types of data and prevent the collection of useless content. After limiting the types of text that can be entered, if the wrong type is entered, a prompt will indicate that the correct content must be entered. 
Validation Content Types
Select the type of content to validate from the dropdown list, and the system will automatically check if the input meets the specified format requirements. If not, an error will be reported.

The following are descriptions of built-in validation rules:
- Character
Limit input content to text, numbers, or symbols.

Used to restrict the types of characters that can be input. If no items are checked, all characters are allowed. When specific items are checked, only characters that meet the selected rules are allowed. Input content can be limited to: numbers, English letters, Chinese characters. The number of input characters can also be set.
- Integer
Limit input content to integer values. Input methods include: input box, numeric keypad.

The range of integer values can be limited. 
-
Decimal Number Limit input content to decimal values. Input methods include: input box, numeric keypad. The number of decimal places and the range of values can be limited.

-
Phone Number Limit input format to phone numbers.

-
Email Limit input format to email addresses.

-
Date Limit input format to dates.
-
Time Limit input format to times.

-
Date Range

-
Time Range Limit input format to time ranges.

-
Duration Limit input format to time intervals.

-
Postal Code Limit input format to postal codes.

-
URL Limit input format to website addresses.

-
Auto Complete When respondents enter content in the input box, hint labels will pop up based on the input. Respondents select the hint labels as the actual input content; arbitrary input is invalid.

To use this, first upload an auto hint configuration file. As shown below, "carbrand" is a configuration file that instructs the system on how to pop up corresponding matching items based on user input.  Auto-matching defaults to a broad, weak matching approach to return more options for respondents to choose from. As shown below, when a respondent enters "min", it will match "Mini".
  Enable precise matching for a strict matching approach, the input string must exactly match the string in the auto-suggestion to be considered a match, but it ignores the case of English letters. In this case, entering "min" will not match any items.
- Dropdown List
When this type is selected, a dropdown list configuration box will appear. Configure the list items inside, using half-width commas as separators.

The range of the number of selectable items can be controlled. When respondents answer the questionnaire, clicking the input box will display a list of options to choose from as input content.
Batch Input
Click the "Batch Input" button to open the batch input dialog box, where you can input multiple option contents. Each line in the window represents an option. After inputting, click "OK" to automatically generate question options by line.
Batch input supports the inclusion of variable content. 
You can also directly double-click the question type node on the canvas to open the batch input dialog box.
Add "Other" Option
Most question types in the system can add an "Other" option.
The other options come in three different types:
-
Option Displayed as selectable choices, similar to typical multiple-choice options.

-
Comments Displayed as an input box, similar to typical fill-in-the-blank options.

-
Both Displayed as an option, but upon selection, an input box appears below the option.

Compared to regular options, the other options exhibit some special behaviors:
- They are always displayed after the regular options and will not participate in randomization;
- The other options are not included in the set of option variables returned by referencing all options through variables.
Carry Forward
In addition to adding specified options directly, questions can also reference specified options from other nodes. Option referencing is achieved through the variable engine.
Typically, option referencing can only reference regular options and cannot reference "other" options. However, there are times when we need to reference other options, or even the content entered in the input boxes of other options. In such cases, we need to create a separate option for "other" options and reference the "input content" of the specified option.
Referencing Different Attributes
While most of the time we primarily reference the content of options, the system supports referencing various other attributes such as the option number, input content, group name, option label, option image, and more, to meet individualized needs.
Applying Additional Filters
When referencing options, you can filter the referenced options. For example, you can specify a range of option numbers to be referenced**:
The filterable attributes supported by the system include**:
- Number: Filters options based on their extracted number.
- Minimum Rank Number: Sorts extracted options by their number in ascending order.
- Maximum Rank Number: Sorts extracted options by their number in descending order.
- Text: Filters input text.
- Minimum Text Rank Number: Sorts extracted options by their text in ascending order, with numbers having the highest priority, followed by the initial pinyin letters and then the initial alphabetical letters.
- Maximum Text Rank Number: Sorts extracted options by their text in descending order, with numbers having the highest priority, followed by the initial pinyin letters and then the initial alphabetical letters.
- Input Value: Filters input content, following the same rules as minimum and maximum text ranking filters.
- Minimum Input Value Rank Number: Filters input content and sorts it in ascending order.
- Maximum Input Value Rank Number: Filters input content and sorts it in descending order.
The operations supported by the system include:
- Between
- Not Between
- Contain
- Does Not Contain
- Equal
- Not Equal to
- Greater Than
- Greater Than or Equal to
- Less Than
- Less Than or Equal to
- List
- Exclude
- Is Empty
- Is Not Empty
- Is True
- Is False
Random Selection from Referenced Options
You can also randomly select options from the referenced ones.
Display Conditions
Control the display logic of options. Click the "Display Conditions" button, select an option in the opened dialog box, and then choose the condition for determining whether the option should be displayed.
You can set combined display conditions for options to control their display more flexibly.
The display conditions can also be applied across multiple question options.
Auto Select Options
Control the automatic selection of options. When the conditions are met, the options will be checked according to the conditions when the question appears.
This is only valid for selection-type questions.
Similar to option display conditions, option selection conditions can also be set in combination for more flexible control.
Recode Option Value
Option labels are used to map option data. For example, if you want responses with a score below 6 to be displayed as "Low Score Evaluation" in the data table, simply enter "Low Score Evaluation" in the option label for the option with a score of 6. When exporting data, you can choose to export it based on option labels.
- Option Label: Add a label to the option, which can be a numerical value;
- Option Description: Add auxiliary descriptive text to the option;
- Add Number: Add a numeric label to the option;
- Add String: Add a text label to the option;
- Add Image: Add an image label to the option;
These can be used in subsequent questionnaire questions through variable referencing.
Basic Settings
Required Question
Set the current question as a required question.
Multiple Choice
Set the current question as a multiple-choice question.
Randomize Options
Display options in a random order. By default, the display order of options on the answer page is the same as the order set during editing, and all respondents see the same order. However, sometimes it is desirable for respondents to see options in a random order to avoid potential influences on their choices caused by the display order of options. In this case, the randomize options feature needs to be enabled. All options of the question will appear in a random order, and the order seen by different respondents will be completely random.

When randomize options is enabled, the system will treat the entire group as an option and randomly sort it along with other ungrouped options. Combined with the Option Grouping feature, intra-group random control can be achieved.
Options referenced from different sources will be automatically assigned to different groups based on their sources by default.
Criculation
Arrange in a circular sequence according to the order of the options. Assuming the order of options is A-B-C-D, when fixed-position cycling is enabled, the system will display the options in a circular sequence such as A-B-C-D, followed by C-D-A-B, then B-C-D-A, and so on. This circular order will be presented to different respondents sequentially without disrupting the arrangement between them. When options are grouped, each group is treated as a single option and cycles with other options or groups in fixed positions. As shown in the following figure, after several cycles in fixed positions, you can see the effect of sequentially adding A1 to B1 from the head of the option queue to its tail.

Follow Source Order
This feature only appears when the question uses referenced options and is only effective for referenced options. When enabled, the order of referenced options will always follow the order displayed in the source of the reference. As shown in the figure below, the left question is a multiple-choice question, and the right question's options, besides 1, 2, and 3, also reference options from the left question. When A3, B3, B1, and A2 are selected in the left question, the right question's options reference those from the left question and are automatically grouped together.

Exceptions
Fix the current option at the top or bottom, with the default being the order in which the options were created.
"Other" options will not participate in randomization and will always be located at the end of the option queue.