Quota
Quota
The quota function allows limiting the number of respondents from different groups based on specific criteria (e.g., age, gender, region, etc.), ensuring the diversity and representativeness of the sample structure. By setting quotas, researchers can precisely screen respondents who meet the research requirements, prevent over-participation from a specific group, ensure balanced sample distribution, and thereby improve the accuracy and reliability of the data, ensuring it aligns closely with research objectives. This function is suitable for multi-dimensional and multi-level research needs, enabling fine-tuned control over samples in complex research designs.
Questionnaire quota refers to the sampling method where researchers stratify or categorize the overall sample based on certain attributes or characteristics (e.g., age, income, education level, occupation, etc.), assign specific sample collection quantities to each stratum or category, and randomly select samples within the defined limits. These attributes or characteristics used for stratification or categorization are called control features. For example, respondents can be classified by age, income, education level, or occupation, and then corresponding sample quota quantities can be allocated to each category.
Whether for market research, academic studies, or user feedback, the quota function provides flexible sample control solutions, accurately screening respondents, preventing irrelevant groups from participating, and enhancing respondents' engagement and satisfaction. At the same time, the quota function improves sample data quality, offering reliable data support for businesses or research institutions and facilitating scientific decision-making.
Quotas can generally be divided into cross quotas and non-cross quotas.
Enter Quota Settings
Setting Survey Quotas
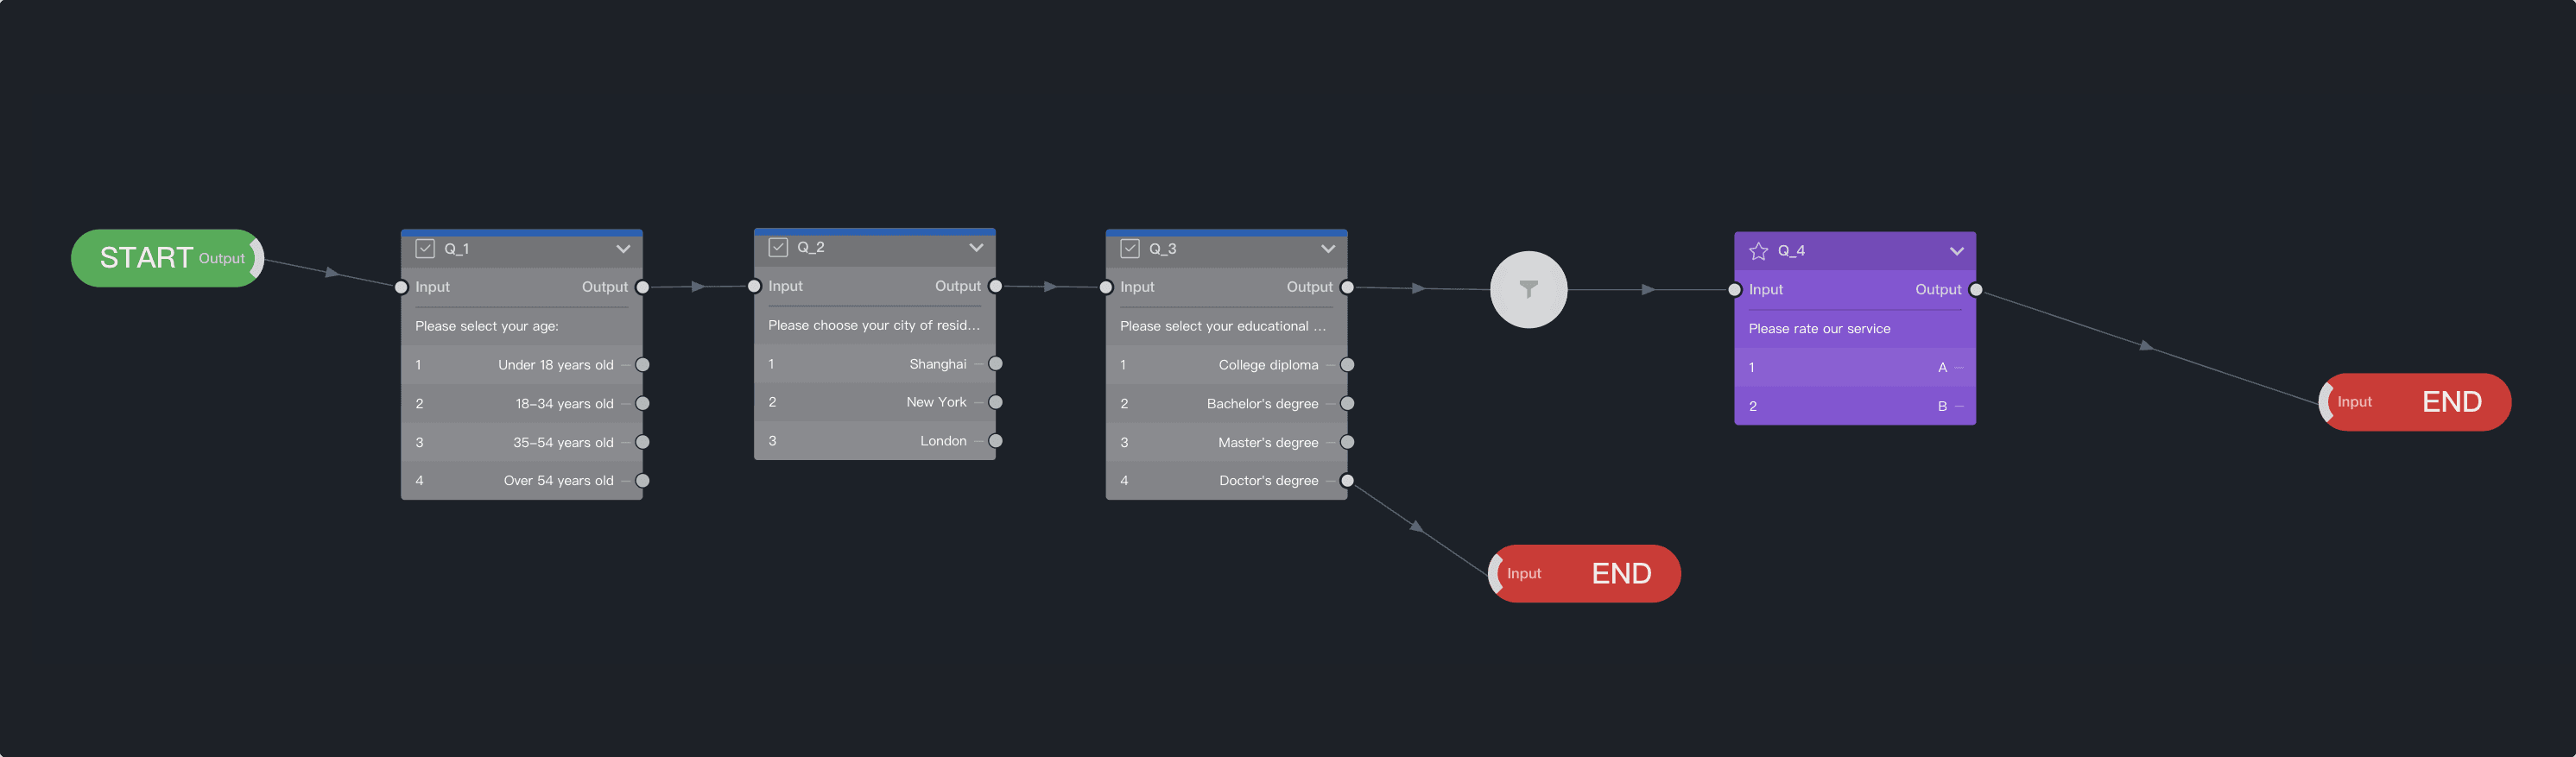
First, let's create a survey as shown in the figure below.
Add Quota Rows
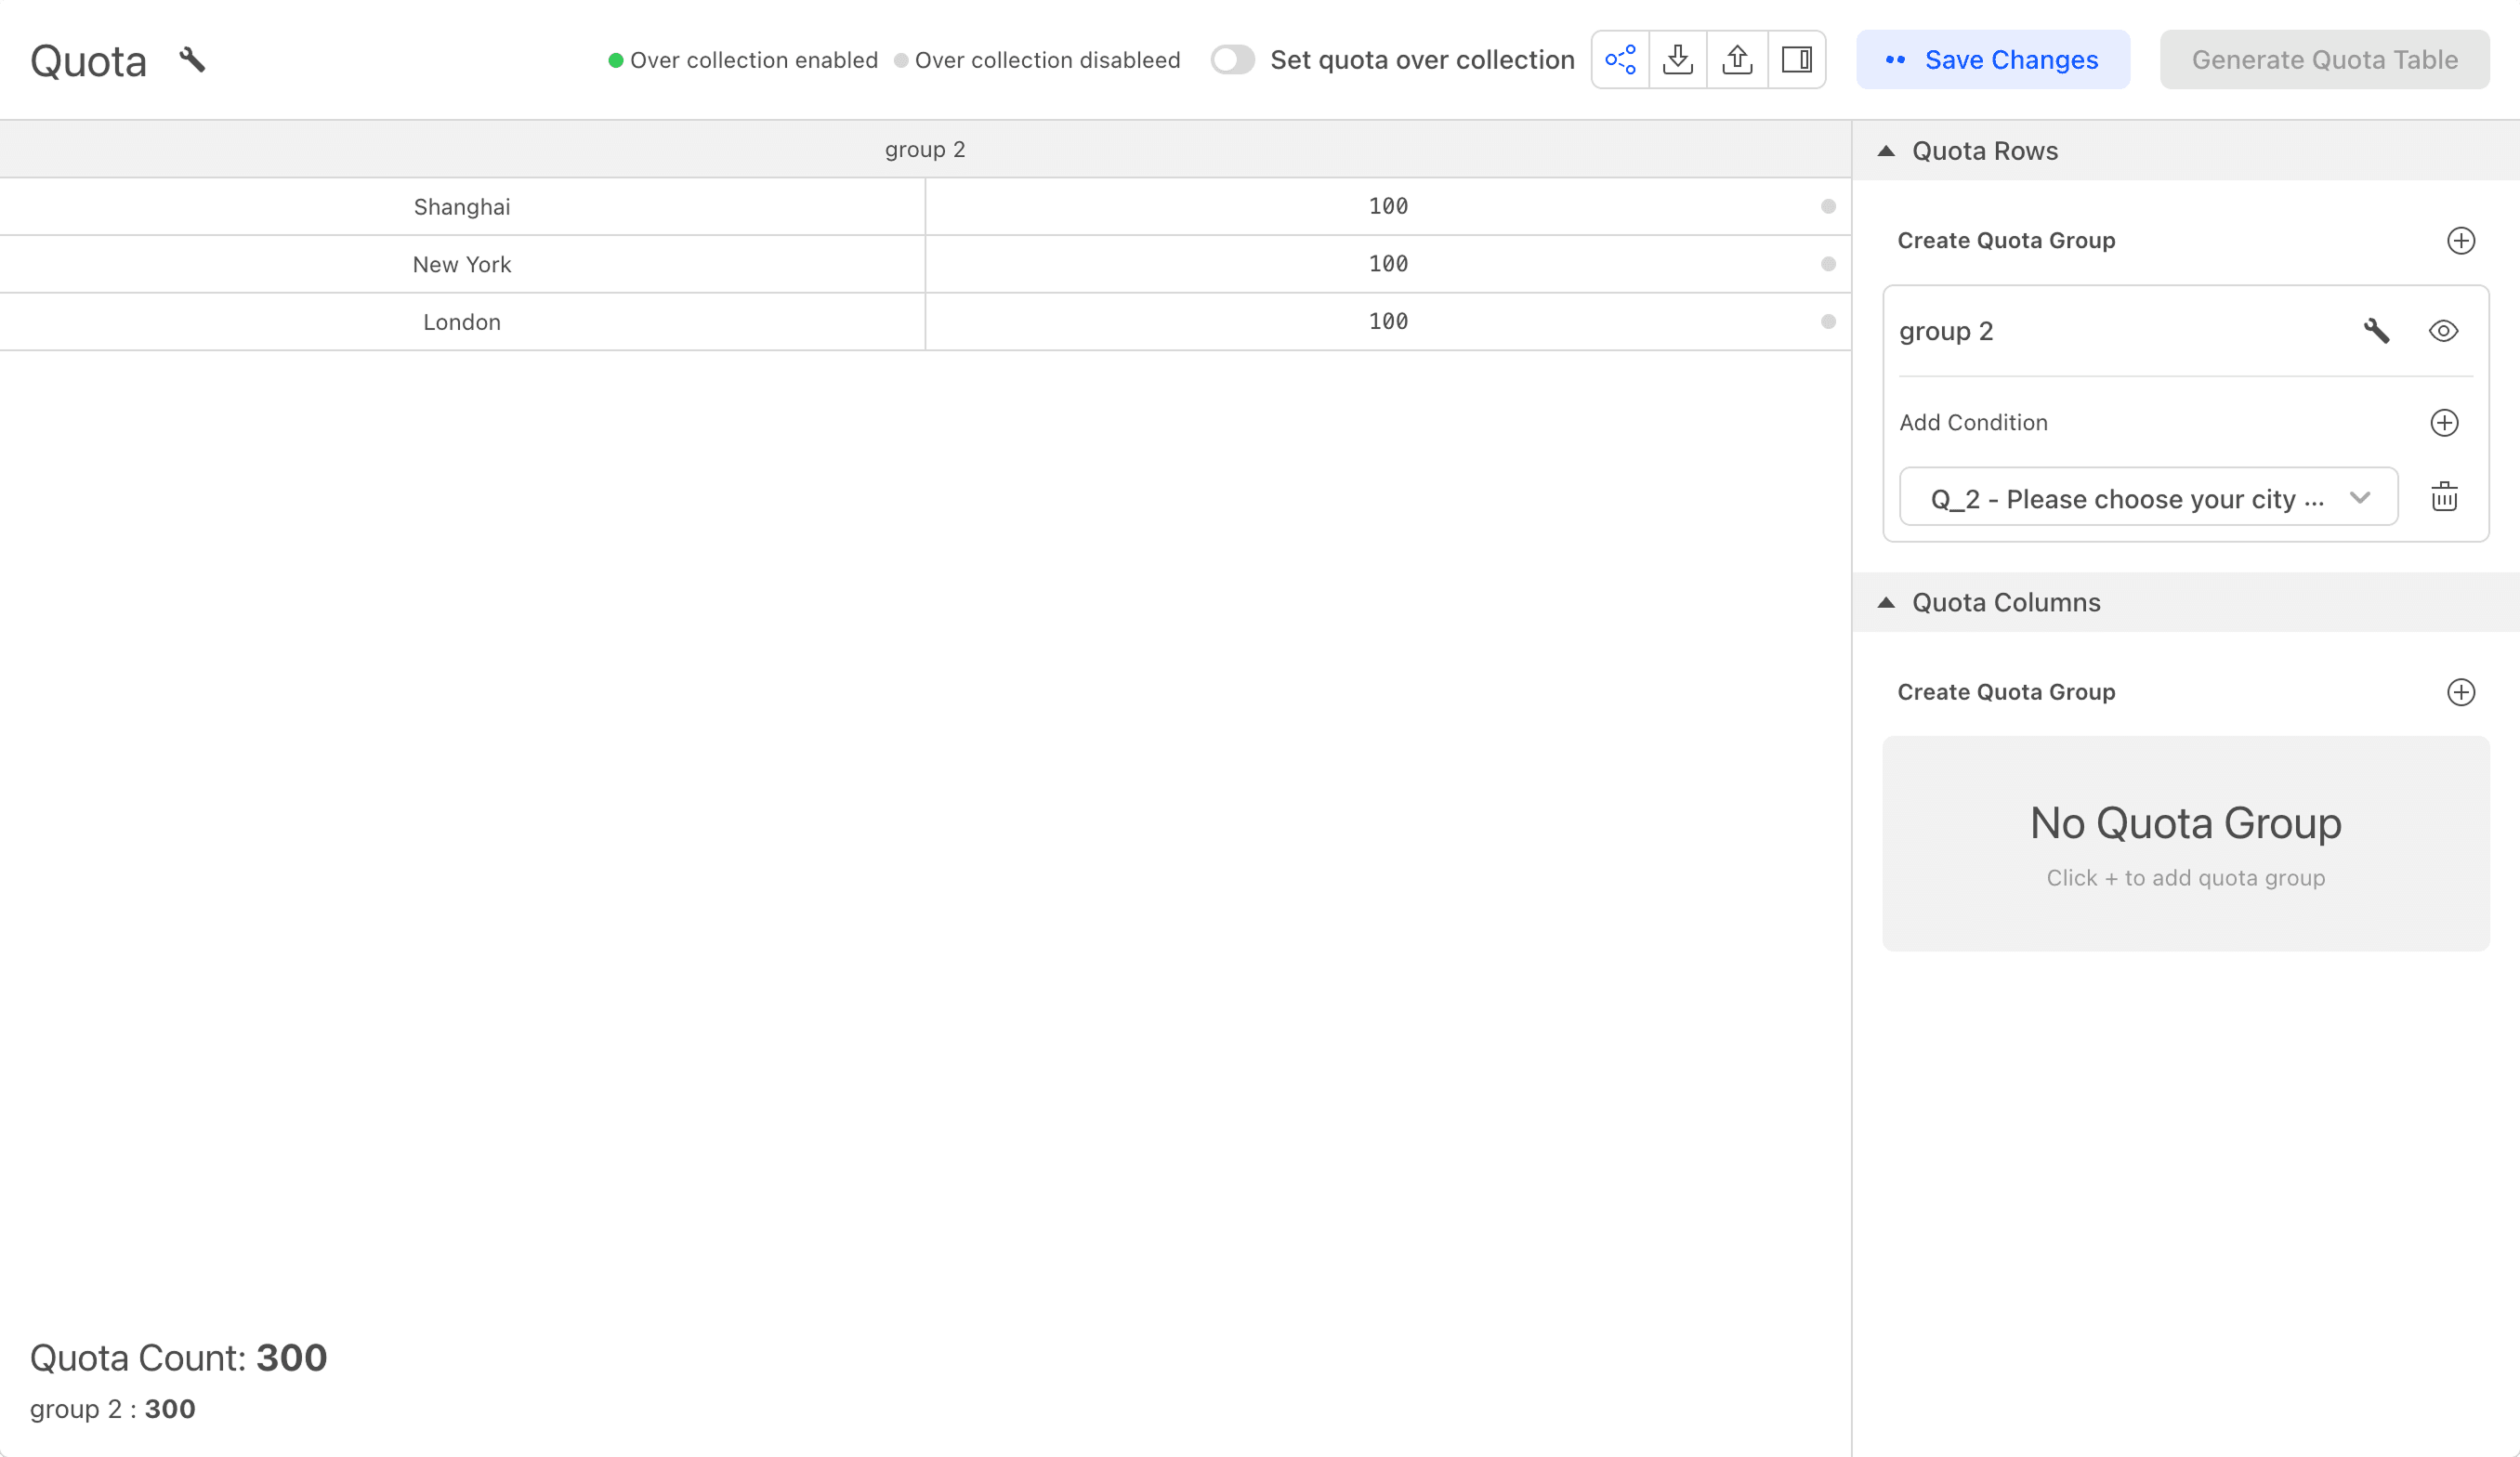
After adding screening functionality to the survey, you can set up the quota table on the quota page. We plan to set the following quotas: The survey plans to collect 300 data points, but respondents' geographical locations need to be screened, with:
- Shanghai: 100;
- New York: 100;
- London: 100;
Click the "Add Quota" button on the right to add a quota setting. Click the ➕ button in the quota row to add a quota group. Then, select question Q_2 in "Add condition within the group," click "Generate quota table" below, and a table will be generated listing the options in Q_2. Set the quota value for each city, which means a quota control is added for this option. When the number of respondents selecting this option reaches the set value, a webhook will be triggered indicating the quota is full for respondents with the same option, and their data will be discarded.
The final quota table will look like the one shown below.
Quota with Screening
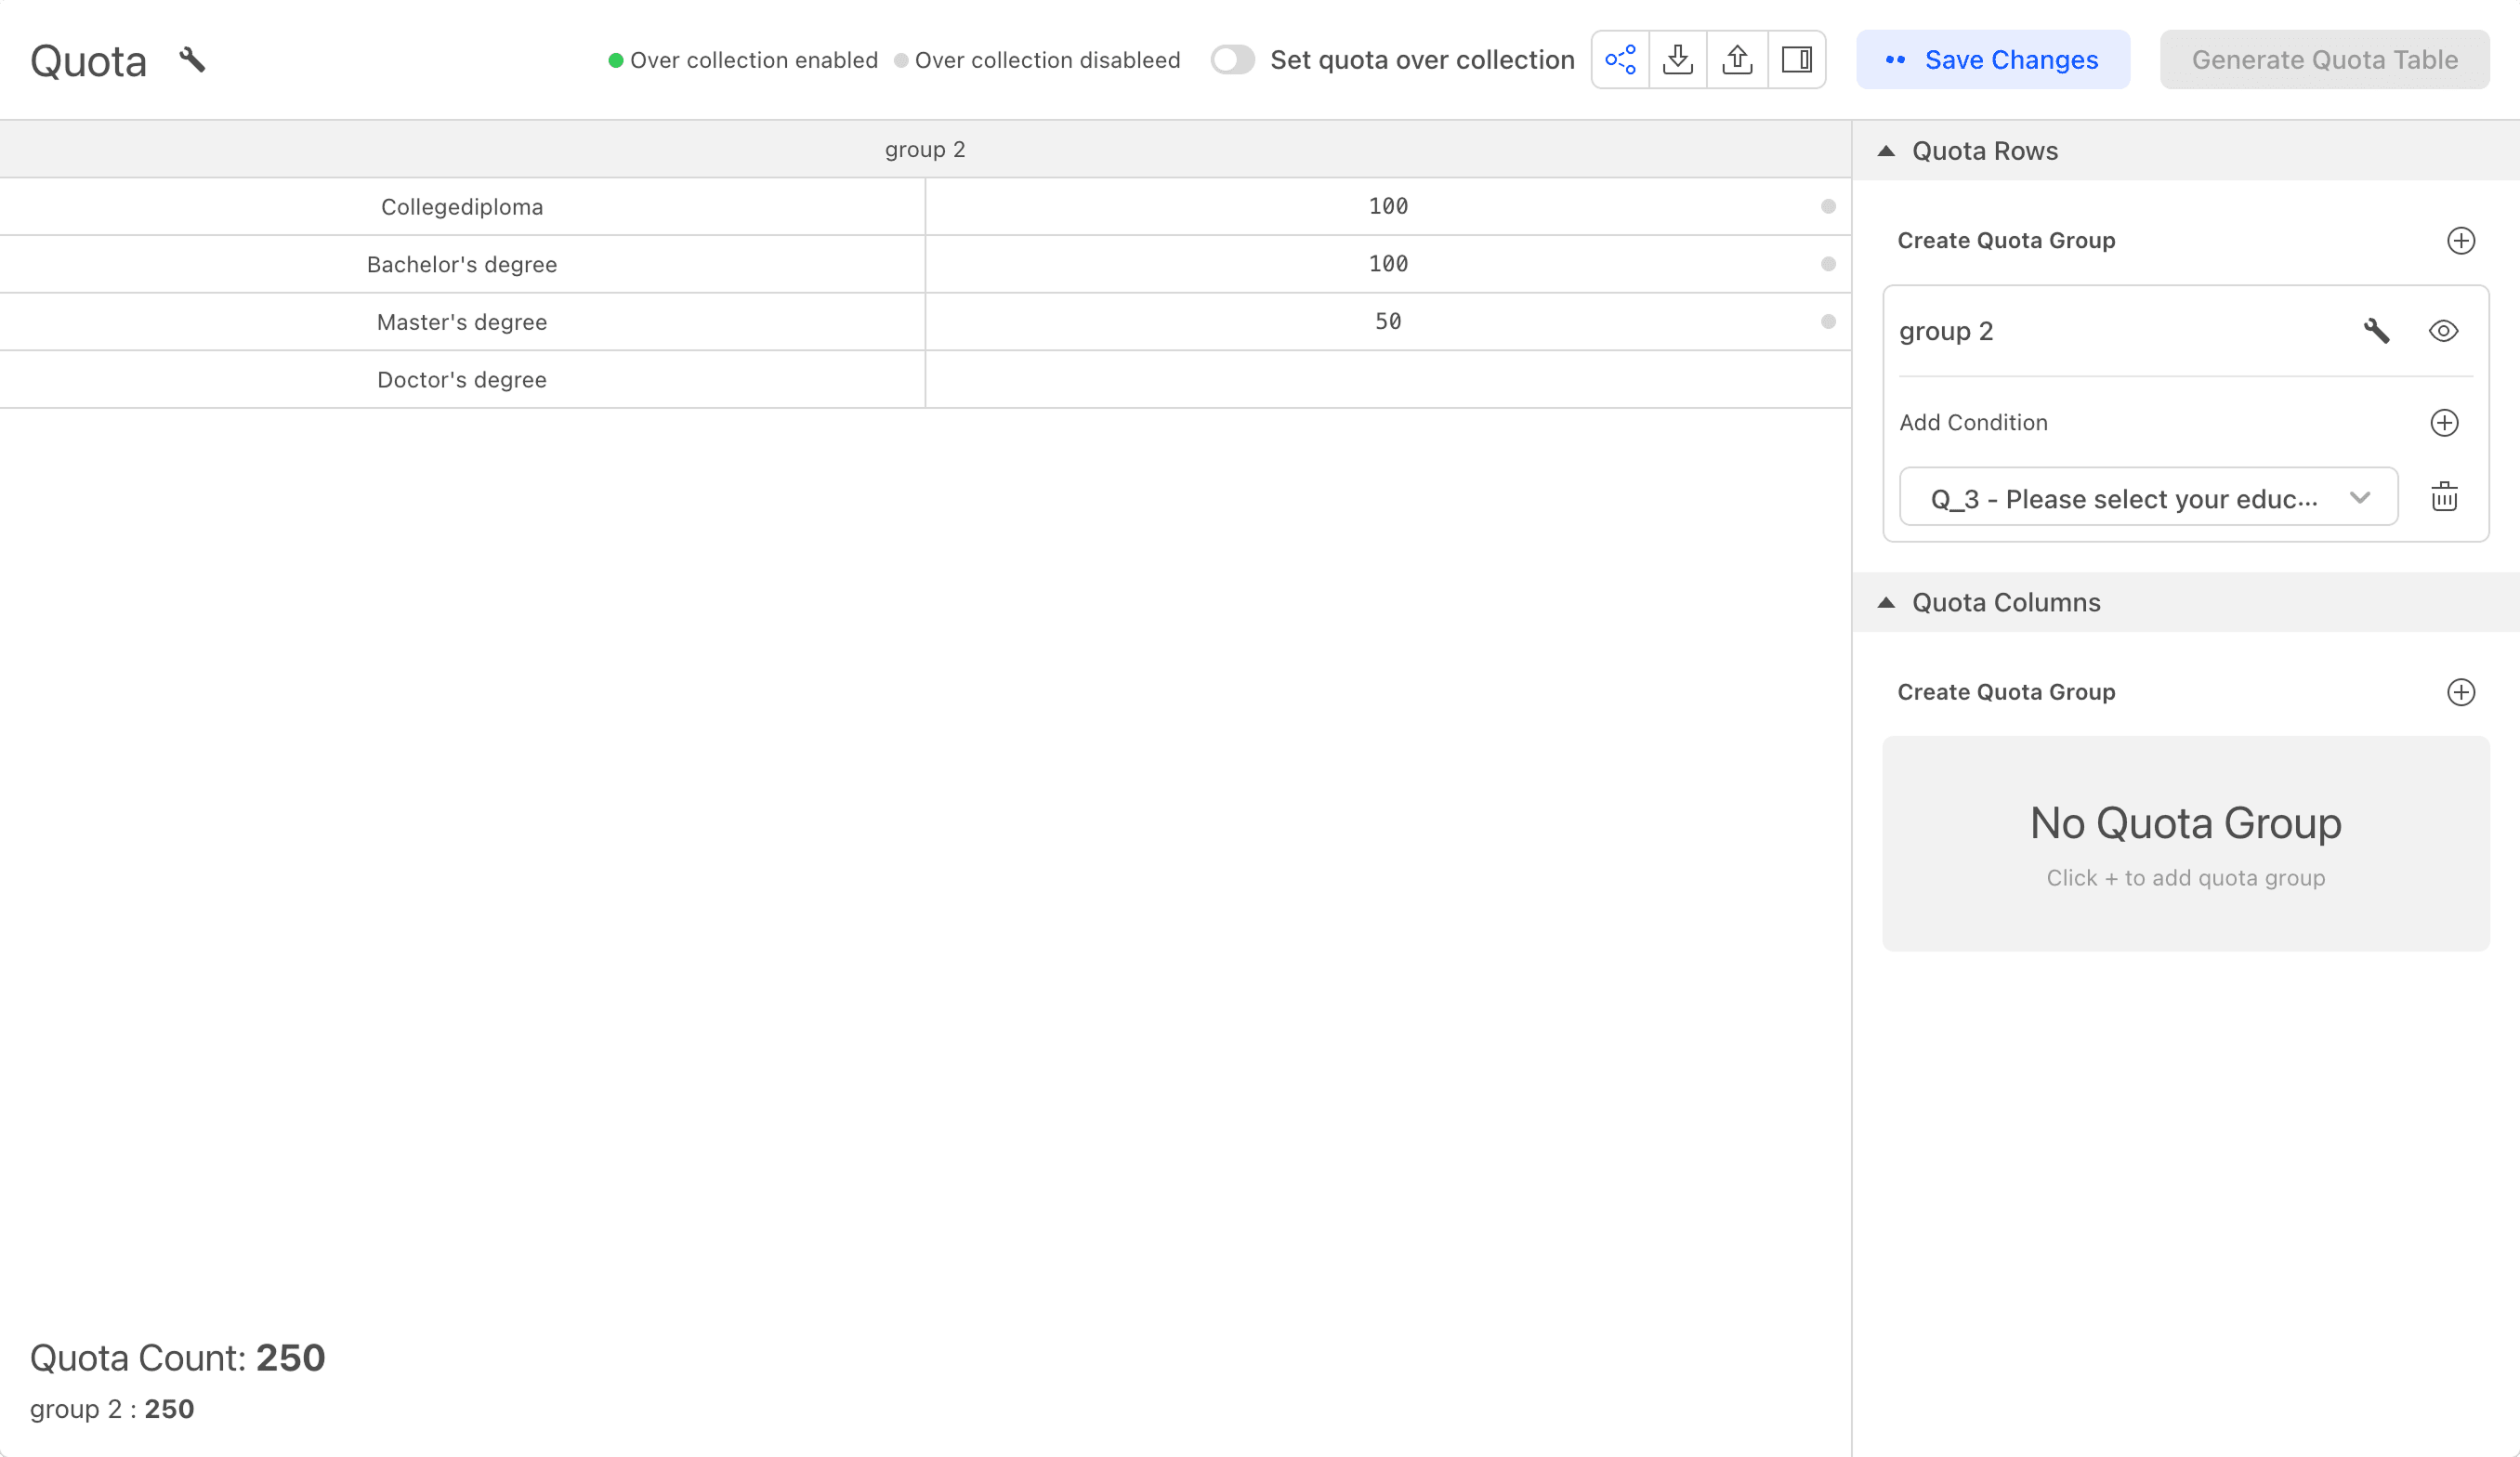
Sometimes, we need to screen out some unmatched respondents. For example, in the survey shown in the image, master's or doctoral degrees are linked to the end page, and we do not need these respondents. Let's see how to set quotas in this case.
- College diploma: 100;
- Bachelor's degree: 100;
- Master's degree: 50;
It should be noted that since the doctoral degree option is linked to the end node, no value needs to be set in the quota table. The survey design logic has a higher priority than the survey quota. When the survey engine detects that a respondent belongs to the excluded category, screening will be triggered, and the respondent's data will be directly discarded. Setting a quota for doctoral degrees would be ineffective because the set collection number would never be reached, which would not affect other units' data collection based on set quotas, but the doctoral quota collection could not be completed because it would always be 0 in actual survey collection.
The final quota table will look like the one shown below.
Multiple Quota Rows
We can add multiple quota groups to the quota row. Based on the quotas set above, click the ➕ button in the quota row to add another quota group. We select Q_2 and generate the quota table. You can see that another table has been added to the quota tables. Set the quotas as follows:
- College diploma: 50;
- Bachelor's degree: 50;
- Master's degree: 200;
- Shanghai: 100;
- New York: 100;
- London: 100;
When multiple quota groups are generated, we now have two parallel quota groups, and the numbers set for each quota group are shared among all quotas. If a respondent is in Shanghai and has a college diploma, they will simultaneously occupy one Shanghai quota and one college diploma quota. In an extreme case, if there are 100 Shanghai respondents with college or bachelor's degrees participating in the survey, it will consume all the quotas for Shanghai, college, and bachelor's degrees, and only respondents with master's degrees in New York and London will be able to participate in the survey subsequently.
The final quota table will look like the one shown below.
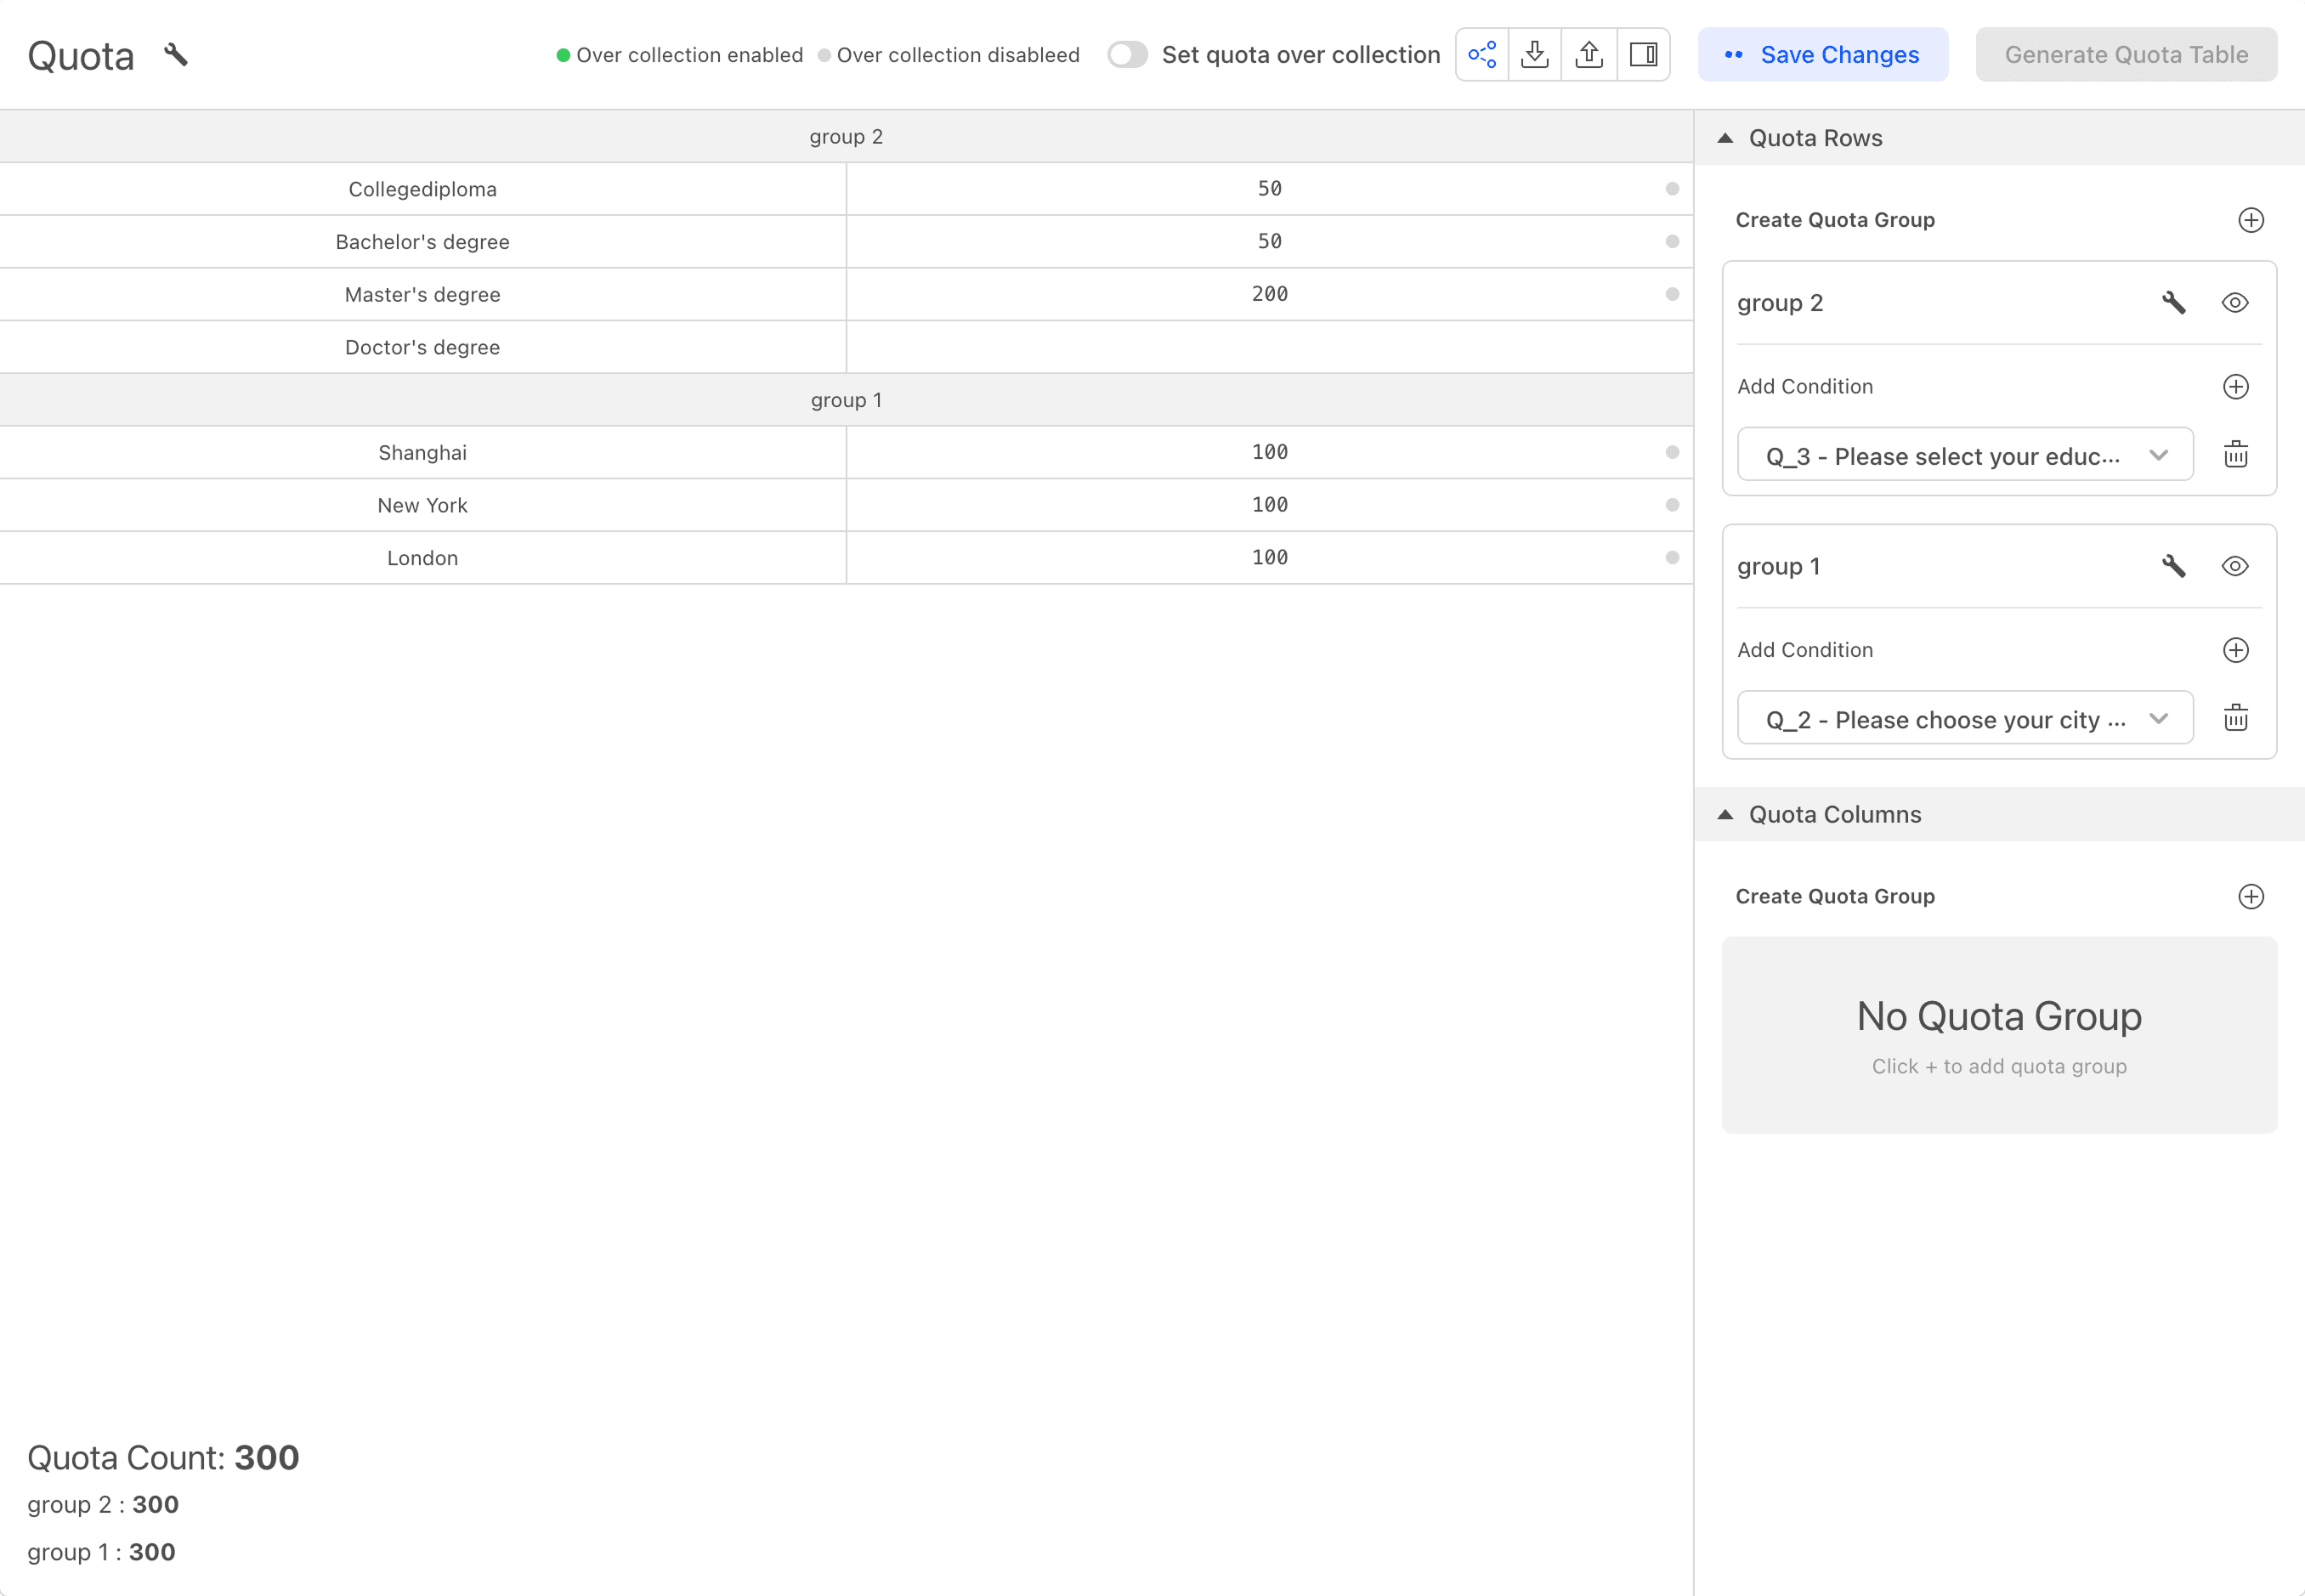
It should be noted that in the case of multiple quota groups, the total quota numbers for each group must be equal.
- Multiple Quota Conditions If we want to set quota numbers for each age group separately for respondents in each city, we need to add multiple quota conditions within one quota group.
Click the ➕ button in the quota row to add a quota group, then select Q_1 and Q_2 in "Add condition within the group" and generate the quota table. At this point, the system will generate a table with two row quota conditions. From the table, you can see that we can now set separate quota numbers for respondents of different ages in each city.
The final quota table will look like the one shown below.

A maximum of 3 row conditions are allowed within one quota group.
Cross Quotas
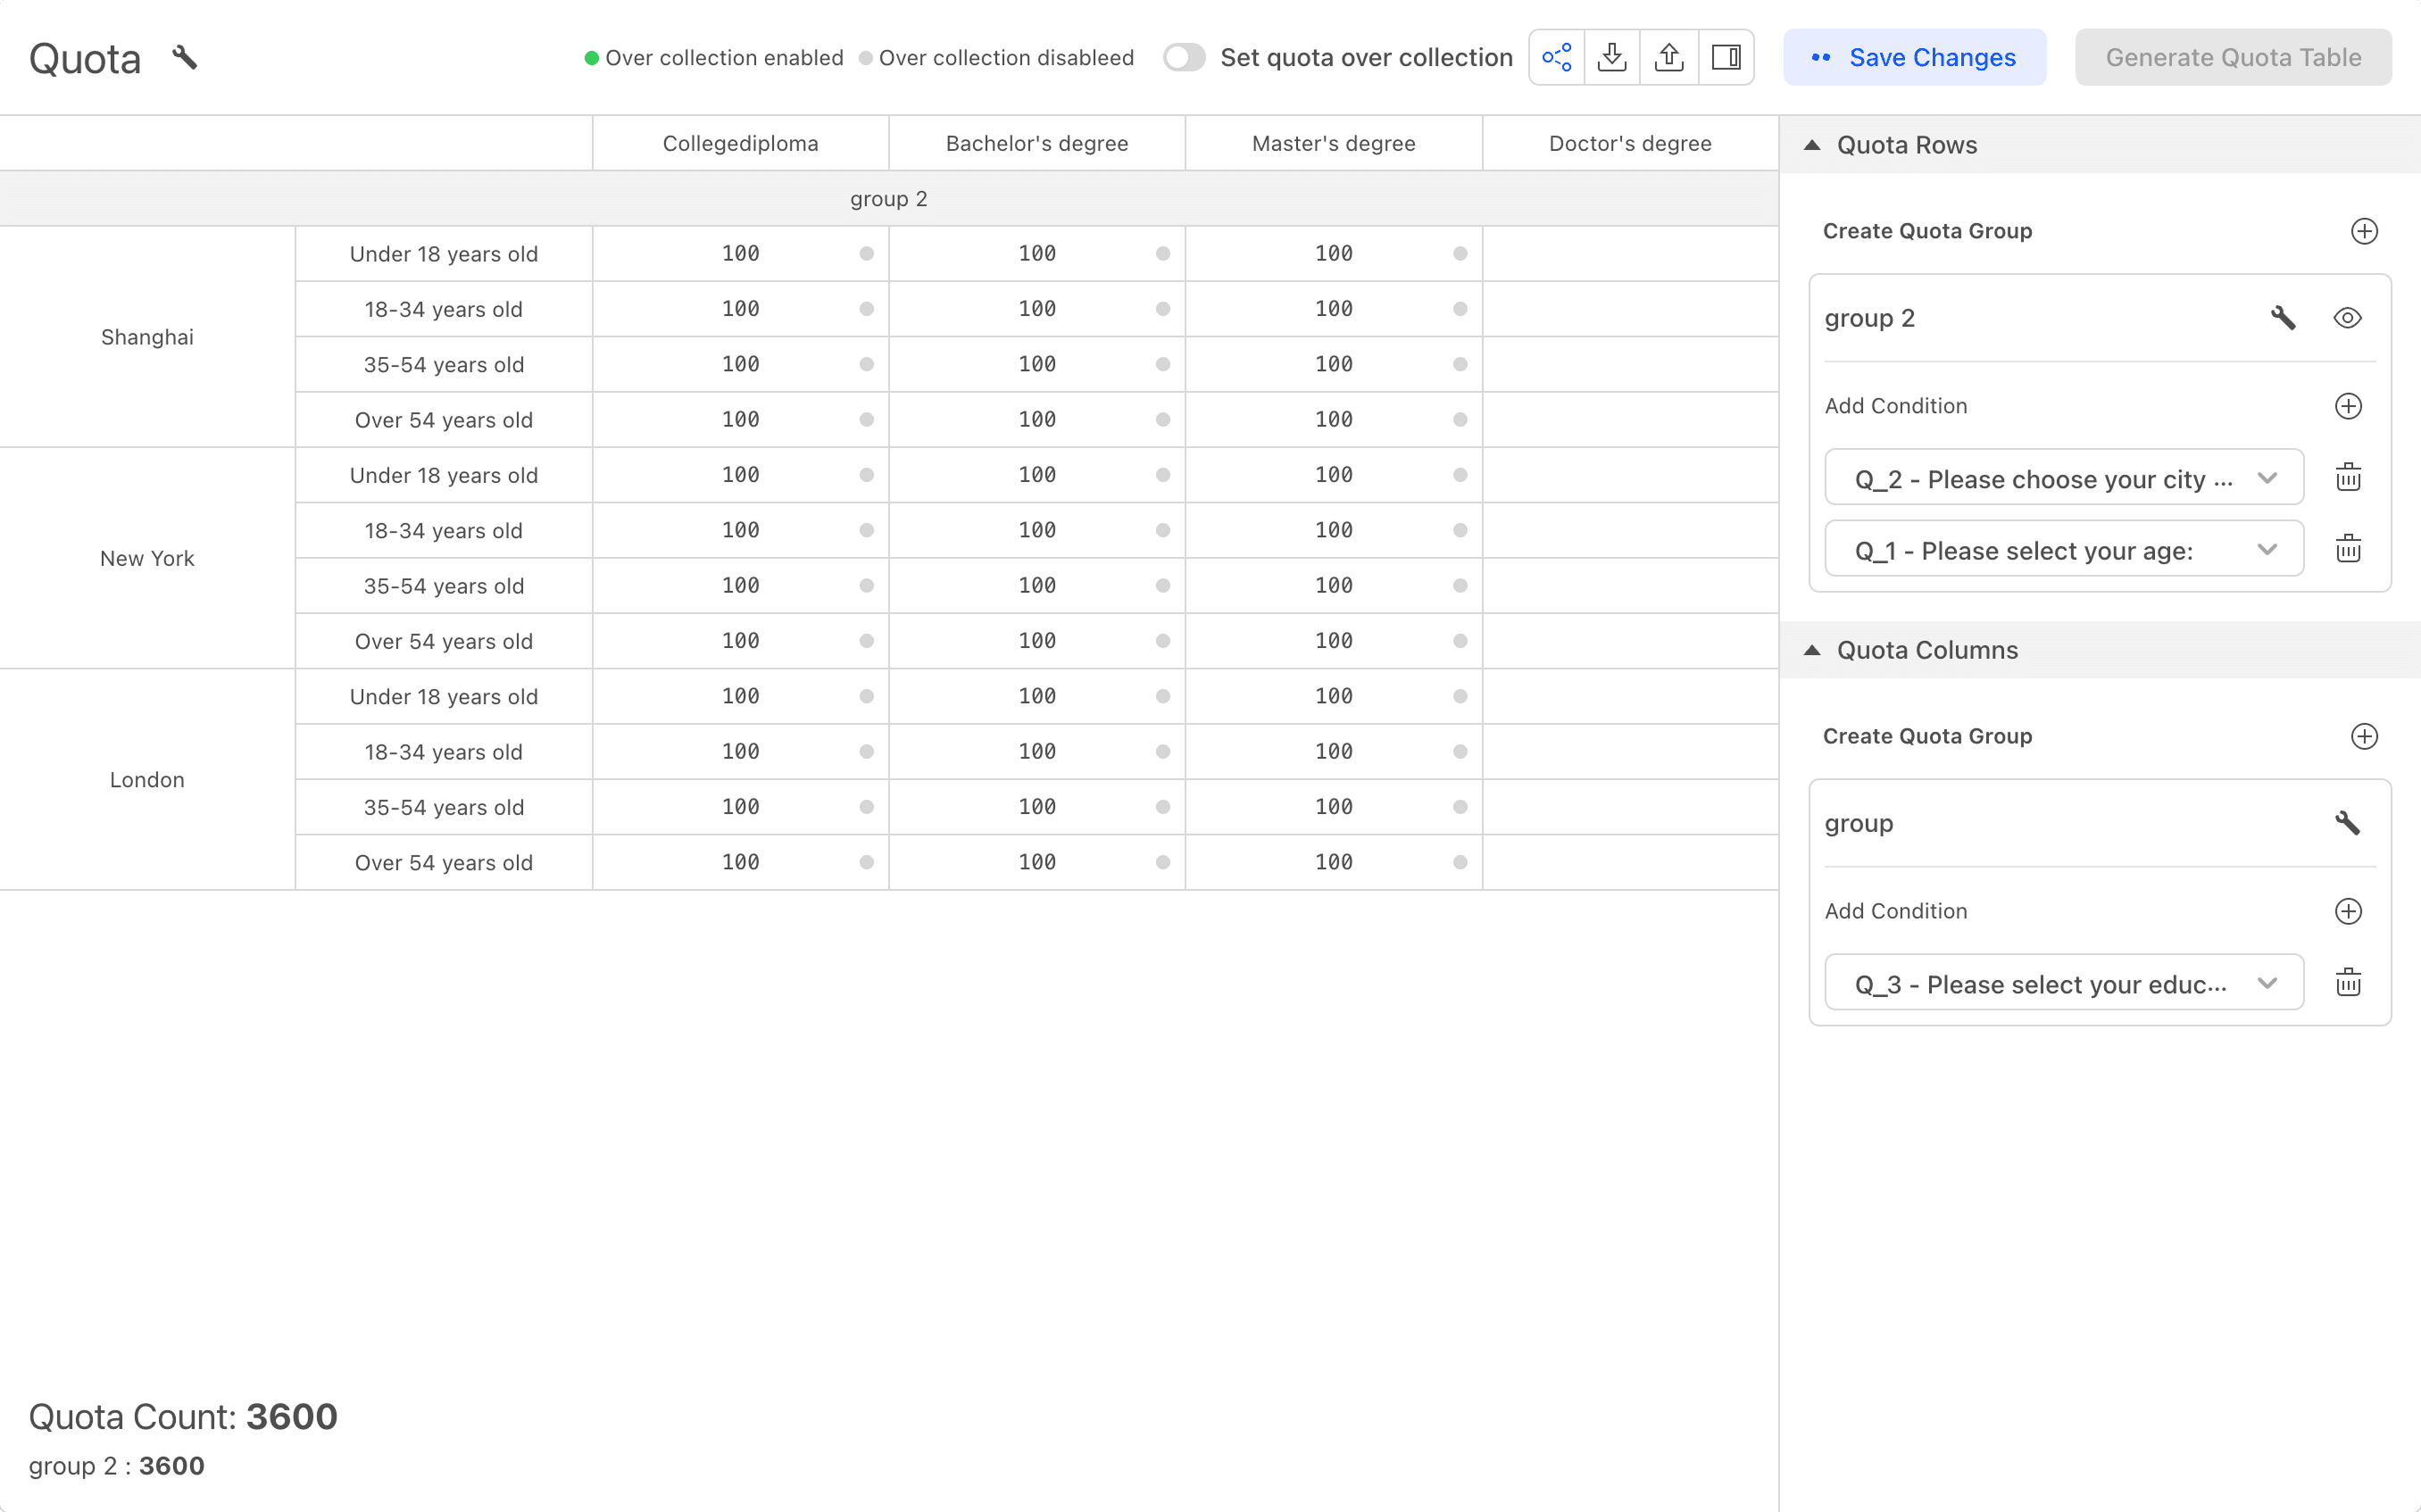
If we want to add education level as a quota condition based on the existing quotas, we can follow the same method by adding another education condition to the quota group in the quota row. Alternatively, we can add quota columns and use cross quotas to achieve the same effect.
Click the ➕ button in the quota column to add a quota group, and then add a quota condition within this group. We select Q_3 and generate the quota table. At this point, the system table will add column quotas, including options for educational backgrounds.
Fill in the quota numbers in the empty cells at the intersection of rows and columns. This number will be controlled jointly by the row and column quota conditions. For example, a respondent from Shanghai, aged 54 or older, with a master's degree, will occupy one quota in the corresponding position until the quota is used up.
The final quota table will look like the one shown below.
Rename Quota Group
Click the tool button on the right of the quota group name to rename the quota group.
Delete Quota Group
Click the tool button on the right of the quota group name to delete the quota group.
Delete Quota Condition
Click the trash can button on the right of the quota condition to delete the quota condition (Note: This should specify deleting a condition within a group, not the entire group as stated earlier).
A maximum of 2 column conditions are allowed within one quota group.
Rename Quota
Click the tool button on the right of the quota name to rename the quota.
Delete Quota
Click the tool button on the right of the quota name to delete the current quota.
Share Quota
You can publish the current quota as a sharable external link. People who receive the link can view the data collection progress of the current quota table.
Set Quota Over Collection
Typically, quotas are used to control the number of survey responses meeting specific criteria during data collection. Once the collection limit is reached, the quota is closed, and it becomes increasingly difficult to fulfill the remaining quotas, potentially leading to sample waste.
In such cases, we can allow overquota collection. Setting overquota will not restrict survey collection. Even when the sample size reaches the quota limit, responses that meet the quota criteria will still be collected, and the system will continue to record valid surveys. The actual number received may exceed the set quota. The benefit of this is to reduce quota waste, and this flexibility allows researchers to adjust sample size strategies based on actual needs.
After enabling the setting to allow overquota collection, click the dot on the right of the quota table cell to toggle the quota cell's status. There are two states:
- Over collection enabled: Represented by a green dot, indicating that sample collection will continue even after exceeding the quota value.
- Over collection disabled: Represented by a gray dot, indicating that data collection will stop once the quota value is exceeded.
Set Quotas via Excel
In cases of multi-row, multi-column quota settings, editing on the page can be cumbersome. You can download the quota settings file, configure it in Excel, and then upload the file. The system will automatically generate the quotas after uploading.
Download Quotas
The main purpose of downloading the quota table is to quickly set quotas for multiple surveys that use the same quota structure but differ only in numbers. In this scenario, you can first download a quota table, then modify the quota numbers in another spreadsheet processing software, and upload the quota table to the corresponding survey. When modifying, please note that only the quantity of each quota can be changed; no other content can be altered.
Upload Quotas
When uploading the quota table, ensure that the quota structure matches the structure of the quota table. After uploading the quota table, the system will automatically update the current quota numbers.